Introduction
 NodeMCU v3 is a very useful and powerful controller based on ESP8266 microcontroller with 2.4GHz WiFi, GPIO ports, analog input, I2C bus, UART and 1wire ports, equipped with a dual-in-line strip male connector.
It's a very cheap open-source platform, a bit expensive in terms of current consumption (normally 80mA @5V = 400mW), but very appreciated in home automations and Internet of Things.
Using the ESPEasy firmware, it's possible to combine this card with Domoticz/raspberry home automation controller.
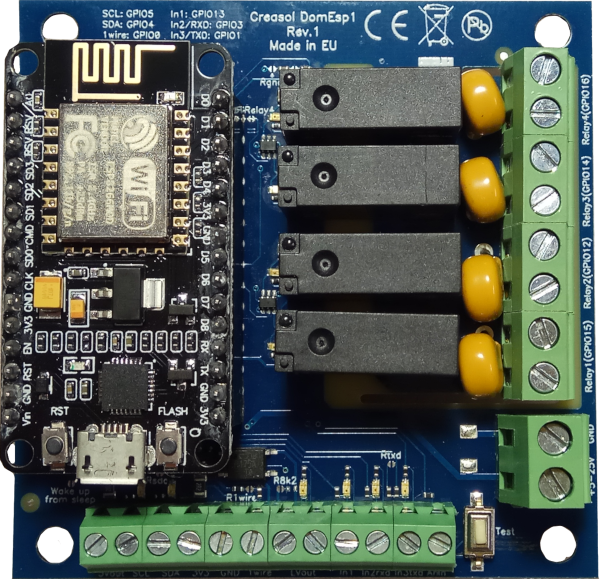
Creasol has designed the DomESP1 board that permits to easily supply the NodeMCU board by a switching mode regulator, and connect inputs, outputs, I2C and 1wire sensors/devices (e.g. DS18B20 thermal and other humidity sensors) by terminal blocks. The board, as shown in the picture, has 4 relay outputs with 5A 250V switching capaibility, and all circuitry to manage I2C bus, 1wire bus, ....
A LED on every input and output permits to check the status of the board and found any problem on wire connections or firmware configuration: LEDs are enabled by pressing the button Test .
The LEDs enable feature and the switching mode power supply lead to a full control of inputs/outputs with an optimized power consumption.
It's possible to purchase:
- the plain DomESP1 board: the client should purchase and program by himself the ESP8266 module, 900 mil header pitch;
- the DomESP1 board, with the ESP8266 module already programmed with the latest ESPEasy firmware.
Installing firmware on NodeMCU board and first configuration
- On Linux, install esptool: for Debian/Ubuntu/similar, run the command
apt update; apt install esptool - Download ESPEasy version 2.0.0 from https://www.letscontrolit.com/wiki/index.php/ESPEasy#Loading_firmware or clicking on https://github.com/letscontrolit/ESPEasy/releases selecting the last version available, and uncompress the zip archive: inside the bin directory you can find several images, read the README.txt to find out which image is for you. For LoLin modules with 4M of ram, a good image is bin/ESP_Easy_mega-20190813_test_core_242_ESP8266_4M.bin
- Connect the NodeMCU board to the PC using a microUSB cable
- Run the command to load the firmware:
on Linux you should install esptool and execute, from the shell,
/usr/bin/esptool --baud 115200 --port /dev/ttyUSB0 write_flash 0 ESPEasy_R120_4096.bin
on Windows or Mac, please read the instructions within the ESPEasy package
You should see on the console the following result:
esptool.py v2.5.0
Serial port /dev/ttyUSB0
Connecting....
Detecting chip type... ESP8266
Chip is ESP8266EX
Features: WiFi
MAC: b4:e6:2d:36:e7:d1
Enabling default SPI flash mode...
Configuring flash size...
Auto-detected Flash size: 4MB
Erasing flash...
Took 1.30s to erase flash block
Wrote 411648 bytes at 0x00000000 in 39.8 seconds (82.7 kbit/s)...Leaving...
Hard resetting via RTS pin... - Enable WiFi on a smartphone or PC, and connect to the SSID ESP_0 using the password configesp
- Set the SSID of the WiFi network where the device will be connected, and associated WiFi password, then click on Connect button.
- At this point, the device will be associated to the selected WiFi network with the given SSID an password.
- Scan the network to find the IP address of the device, and connect to it using a browser: http://DEVICE_IP_ADDRESS
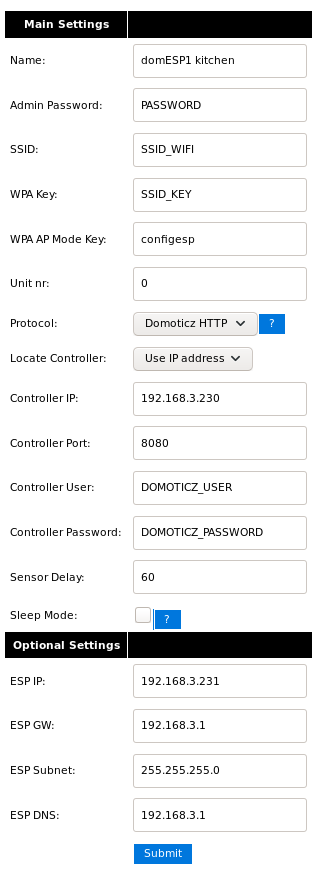
- Configure the main parameters:
![creDomESP1 config1]()
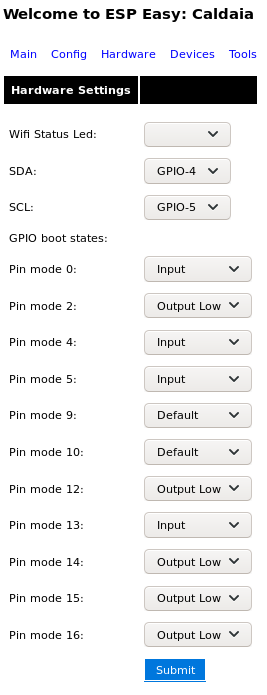
- Set the GPIO default configuration:
![creDomESP1 config hardware]()
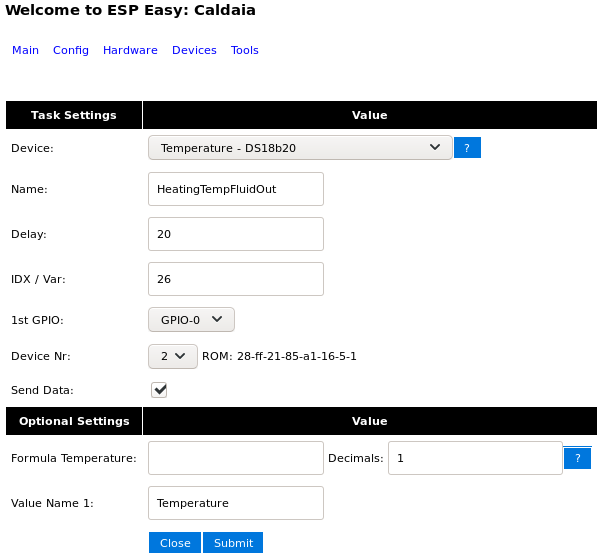
- Configure devices (e.g. temperature sensors):
![creDomESP1 config device]()
![creDomESP1 config devices]()
- If the two blue LEDs on the NodeMCU board are annoying you, you can remove them, of course: in this case you avoid extra power consumption for useless LEDs.


