")
")
")
")
")
")

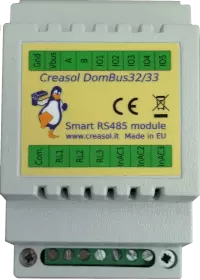
DomBus modules are connected together by a serial bus, using a thin/common alarm cable with 4 wires: 2 to carry the 12-24Vdc power supply and 2 wires for data at 115200bps 8,n,1 using the RS485 industrial grade balanced bus.
Normally, the bus is connected to the domotic controller by a thin cable, using a cheap RS485/USB adapter.
In case that the bus cannot be physically connected to the domotic controller (different area, no possibility to route cables, ...), it's possible to use a radio link, MQTT or TCP tunnel to keep into communication the domotic controller with the DomBus network.
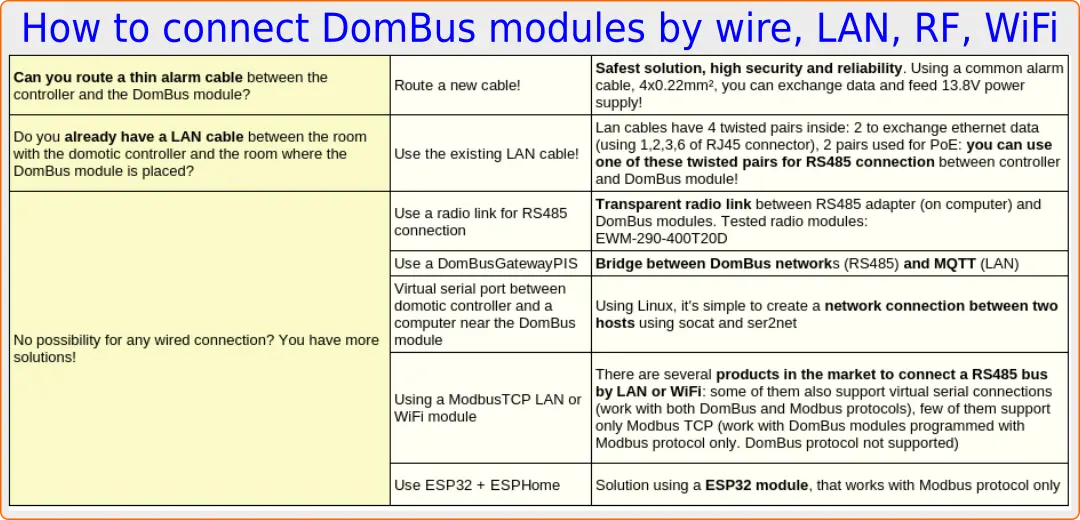
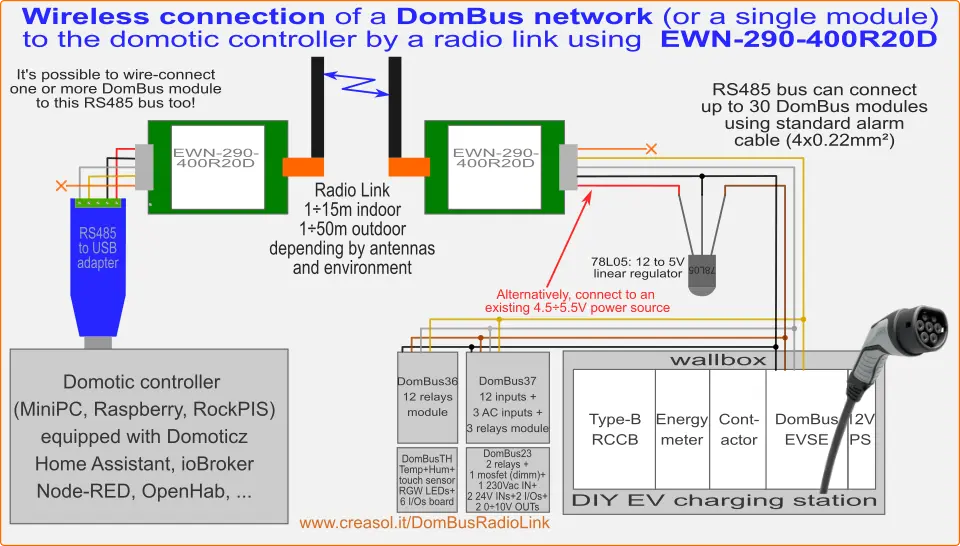
Using a radio link to connect together two RS485 buses
Works with DomBus modules programmed with DomBus and Modbus protocols.
It's possible to find in the market radio devices that permit to interconnect two RS485 buses transparently. In this way it's possible to radio connect:
- a domotic controller to one or more DomBus modules in a remote location
- a DomBus network with another one in a remote location
Below the description of the connection using different radio systems.
1. Using EBYTE EWM-290-400T20D to get a transparent wireless link between two RS485 buses
EBYTE model EWM-290-400T20D is a very cheap LoRa module with RS485 interface that is able to work at 62500bps air bitrate in 433÷434MHz band with up to 20dBm power, and up to 115200bps on the RS485 port. Be careful that module has not CE marking so, in Europe, it can be used for testing only.
It is provided with a 5 wires cable:
- 5V should be connected to 4.5÷5.5V, 100mA max current consumption
- GND to be connected to the ground
- TXD/A to be connected to RS485 A
- RXD/B to be connected to RS485 B
- STB: don't care
433MHz antenna, with SMA-male connector, is not supplied with the module, so it must be purchased apart.
EWM290 module configuration
The module can be connected by AT commands. Default UART mode is 9600,8,n,1 and each command must be sent as a single sequence, without delay between characters, so you can select each command with the mouse and paste into the terminal program.
In Linux it's possible to use picocom -b9600 /dev/ttyUSBx to connect the device at the working bitrate (9600 by default, -b115200 if already configured) and send command
AT+MODE=2
to put the module in configuration mode: now the module selects 9600bps, so if you issued that command at a different bitrate, exit picocom (ctrl-a ctrl-x) and run command picocom -b9600 /dev/ttyUSBx again, then send each of the following lines specifying a random KEY value between 0 and 65535 (not 12345!).
AT+RATE=7
AT+PACKET=0
AT+POWER=0
AT+LBT=1
AT+UART=7,0
AT+KEY=12345
AT+CHANNEL=24
AT+MODE=0
Now the module is in transparent mode, forming a wireless radio link between the two RS485 buses.
LAN / WiFi / Internet trunk between domotic controller and DomBus modules
Some solutions are taken into account to let DomBus module communicating with the home automation controller.
Please note that DomBus modules are available with two different firmwares:
1. supporting DomBus protocol, proprietary, very low latency protocol, ideally for relays, outputs, sensors, inputs, buttons/switches, alarm sensors, EVSE, Solar Tracker controller and more... Using Domoticz plugin or DomBusGateway (DomBus 2 MQTT bridge with AutoDiscovery, compatible with all home automation systems supporting MQTT), all entities are created automatically.
2. supporting Modbus protocol, standard, not suitable for buttons/switches or alarm sensors that have to be managed without latency. Modbus protocol is suitable for relay outputs, EVSE module, Solar Tracker controller, temperature/humidity sensor inputs and other inputs/sensor with polling interval greater or equal to 5 seconds. It's compatible with almost any home automation systems, and also can be useful to realize custom products using the well known Modbus protocol.

1. Using DomBusGatewayPIS hardware (DomBus 2 MQTT bridge)
Works with DomBus modules programmed with DomBus protocol.
This is a ready-to-use mini computer, based on Rock PI S, consuming only 400mW, equipped with Linux + firewall + backup + mosquitto + DomBusGateway software, that permits to connect one or more DomBus module (using DomBus protocol, not Modbus!) to a MQTT broker (inside the same mini computer, or an external broker like Mosquitto running in Home Assistant controller). Communication with the home automation sytems works by MQTT standard protocol, even with AutoDiscovery extension for controllers that support this feature (like Home Assistant, NodeRED, OpenHAB, ioBroker).
The module is available at https://store.creasol.it/DomBusGatewayPIS , but it's possible to DIY it by using the image that can be freely downloaded. Check https://github.com/CreasolTech/DomBusGateway for the instructions.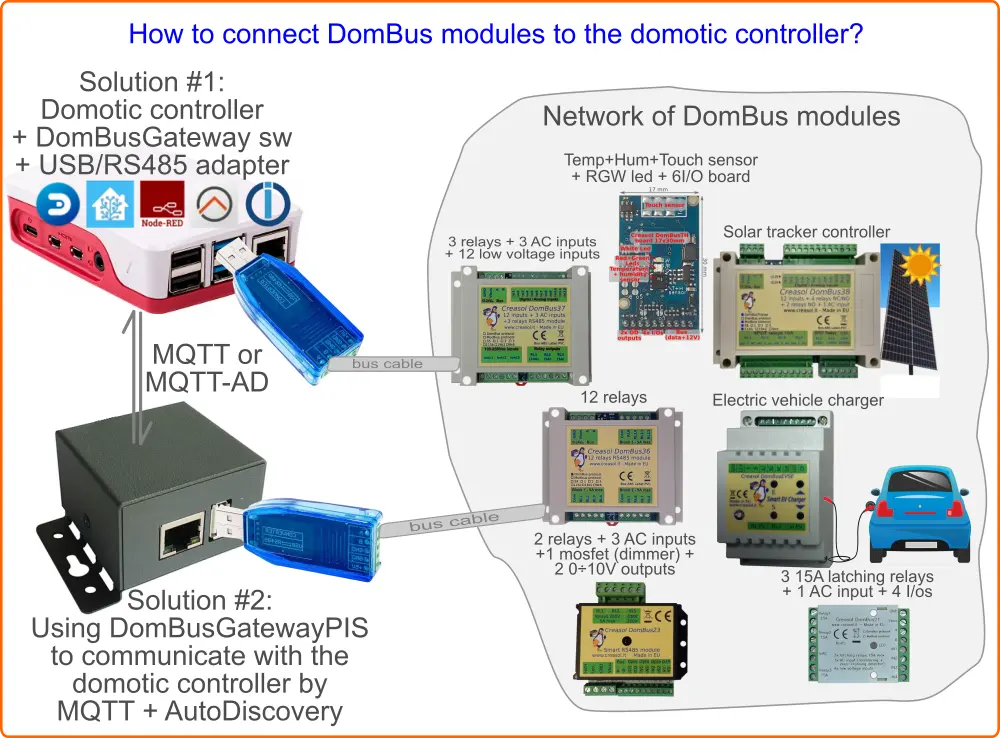
2. Virtual serial over TCP/IP between two linux devices
Works with DomBus modules programmed with DomBus and Modbus protocols.
If domotic controller is hosted in a linux device (for example a Raspberry PI or NUC, now called "main") and the DomBus devices are connected to another linux device (Raspberry, Rock PI S, QNAP, ..., now called "slave"), it's possible to have the main controller connecting the DomBus network by a TCP/IP connection, wired or wireless, in this way:
- On the slave device (where the DomBus network is connected using the cheap USB/RS485 adapter), install the ser2net service:
sudo apt install ser2net - Configure the ser2net service by modifying the file /etc/ser2net.yaml :
sudo nano /etc/ser2net.yaml - Remove existing connections that are not used, and insert the following lines to define the connection with one bus:
connection: &dombusaccepter: tcp,2000enable: onoptions:kickolduser: truetelnet-brk-on-sync: trueconnector: serialdev,/dev/ttyUSB0,115200n81,local - It's possible to modify the tcp port (2000, in the example) and serial port (ttyUSB0 in the example).
- In case that more than one DomBus bus are connected to the slave device, define a connection for each bus (specifying a different TCP port for each bus).
- Restart the ser2net service using the command service ser2net restart
- Test that it works by using the command telnet localhost 2000 on the slave device; ctrl+] to exit
- On the main device (with Domoticz, Home Assistant, Node-RED, OpenHAB controller...) install the socat application:
sudo apt install socat - Exec the following command to create the virtual serial port /dev/ttyUSBDomBusNet to manage the DomBus devices attached to the slave device: socat pty,link=/dev/ttyUSBDomUSBBusNet tcp:192.168.6.2:2000 where 192.168.6.2 should be replaced with the IP number of the slave device
- In case that connection is done through internet or one or more routers with NAT, maybe it's needed to configure port forwarding / destination NAT on the routers
- Test the whole system by executing the command cat /dev/ttyUSBDomBusNet : if it works, write a small bash script to activate the virtual serial port, and call that script from /etc/rc.local assuring that there is the "&" character at the end, to execute the script in background:
#!/bin/bash# New file /usr/local/sbin/dombusnet.sh , permissions 0700# Thanks to Patrick Schaerer for testing and suggestionsTTYDEV=/dev/ttyUSBDomBusNetTCPSERVER=192.168.6.2TCPPORT=2000while true; dosocat pty,link=${TTYDEV},waitslave tcp:${TCPSERVER}:${TCPPORT}sleep 5done# End of file# File /etc/rc.local# ......../usr/local/sbin/dombusnet.sh &exit 0
This is a the cheaper solution to control DomBus modules by a wired or wireless connection in case that DomBus modules are located in a area where a linux device is already active
3. Connecting DomBus modules by using a RS485 to Ethernet or WiFi converters
Works with DomBus modules programmed with Modbus protocols. Some LAN/WiFi modules also supports virtual serial port, working with DomBus protocol too.
Using an ethernet <--> RS485 converter like MOXA NPORT or other devices it's really simple to connect RS485 devices (DomBus modules, or other Modbus RTU modules) that are placed in a different area from the controller.
In this case a driver should be installed to create a virtual COM port (virtual serial port) to access the remote RS485 bus.
Below a list of RS485 to ethernet converters:
- Lilygo T-CAN485 : WiFi board based on ESP32, has been tested with DomBus modules equipped with Modbus firmware and Loxone controller. (Thanks Filip for sharing info!)
- PUSR-TCP232-304 : tested, works perfectly with both Modbus and DomBus protocol, supporting virtual com, RS485 to Ethernet (not WiFi). (Thanks DaniloT for sharing info!)
- PUSR W610 RS485/RS232 to WiFi/Ethernet : not tested, but the manufacturing company says it works using socat program (Linux) or Windows software provided by the manufacturer. TCP port is configurable on the module (Local/Remote port number)
- Waveshare RS485 to WiFi / Ethernet : not tested, but the manufacturing company says it works using socat program (Linux)
- Waveshare RS485 TO ETH (available also with PoE support) : not tested, but the manufacturing company says it works using socat program (Linux)
- Protoss PW11 or PW21 RS485 to WiFi/Ethernet : not tested, but it should work
If you know other devices that can be used for this purpose at reasonable prices, please let us know.
4. Using ESP32 + ESPHome to connect Modbus modules like DomBus with Modbus firmware
Works with DomBus modules programmed with Modbus protocol.
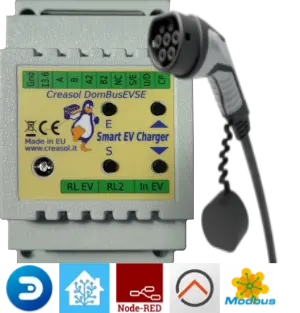
Slawomir describes in the github page https://github.com/SCiunczyk/wallbox-diy how to use ESP32 + ESPHome firmware to create a gateway between Modbus devices (DomBus modules programmed with Modbus firmware, not Dombus firmware) and Home Assistant, using WiFi. This is only a part of the described project, that permits to charge an electric vehicle by using single-phase (low power, from 1kW to 7kW, generally used in Solar mode) and three-phase power (used to charge the vehicle at full speed, from 4kW to 22kW) by using the Creasol DomBusEVSE module.
Thanks to Slawomir for sharing info about his very smart wallbox!