")
")
")
")
")
")

Domoticz is a multiplatform home automation system, very compact and fast because written in C++. It permits to write even complex automations to manage, for example, a complete alarm system, heat pump full control, ...
A book about it is available at https://github.com/rwbl/domoticz-homeautomation-workbook
This page shows how to make a new fresh image with Raspbian+Domoticz+firewall+backup. Raspbian + Domoticz, updated on 2022-06-10
If you prefer to purchase a high quality SD already programmed, visit our shop.
Writing an image for Raspberry
We're proposing a quick solution to install a pre-configured image of Raspbian for Raspberry PI3 or PI4, completed with latest Domoticz software and configured to preserve MicroSD flash device (flash cannot be safely written more than 10000 times) and exporting a weekly backup that can easily restored in case of problems.
This image was tested on both Raspberry PI3 and Raspberry PI4 hardware, and uses the last Raspbian Buster distribution.
Flashing this image in a microSD, you are immediately ready to configure your Domoticz devices from the web interface.
Image is available at http://dl.creasol.it/raspberry_domoticz_0x12345678.fsa and can be installed from linux or another raspberry using the raspberry_domoticz.sh script; Windows users can use putty to connect their raspberry by SSH protocol, and winscp or filezilla to transfer files between their windows PC and raspberry. Linux users can use their PC to make the copies.
Features
- Works with both Raspberry PI4 and Raspberry PI3
- Raspbian Buster + a recent version of Domoticz
- Optimized to reduce writing on flash: /tmp and /var/log are in ramfs, not SD, and swap is disabled. Domoticz temporary files are written in /tmp, not in SD, extending in this way the memory life
- Firewall with iptables/netfilter, that can be configured editing /usr/local/sbin/myfirewallpi.sh
- Backup that automatically create an incremental backup of files changed; one day per week do a full backup and one day per month do a image creation; backup can be easily exported to an attached USB hard disk or NAS (FTP or CIFS).
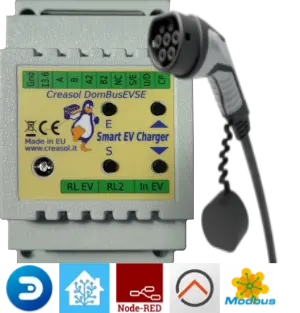
- Domoticz is partially configured with some devices and with Creasol Dombus plugin already installed (Domoticz plugin to use Creasol DomBus devices attached to the Raspberry by a RS485 serial bus).
Extracting the image to a microSD
Connect the microSD to a Linux computer or to Raspberry (using a USB memory reader).
Run the following commands to download the raspberry image from our website and extract it on the SD. Windows users can connect to their raspberry console using putty
[code]#become root
sudo su -
#download the image creation/restore script
apt update
apt -y install curl
curl -o /usr/local/sbin/raspberry_domoticz.sh http://dl.creasol.it/raspberry_domoticz.sh
chmod 700 /usr/local/sbin/raspberry_domoticz.sh
#donwload the image
cd /
curl -o /raspberry_domoticz_0x12345678.fsa http://dl.creasol.it/raspberry_domoticz_0x12345678.fsa
#and now start the raspberry_domoticz.sh script
raspberry_domoticz.sh
[/code]
then the raspberry_domoticz.sh script will guide you to write the image /raspberry_domoticz_0x12345678.fsa on a microSD connected to domoticz by a SD memory USB reader.
This is the output of raspberry_domoticz.sh script, in bold the text written by the user:
Would you like to create an image of the SD [SD => IMAGE] (Y/n/ctrl-c)
n (no, don't need to create an image, I need to extract an image!)
Would you like to write an image to new SD [IMAGE => SD] (Y/n/ctrl-c)
y (yes! extract an image to SD)
========== List of attached devices: ==========
NAME MAJ:MIN RM SIZE RO TYPE MOUNTPOINT
sda 8:0 1 1.9G 0 disk
`-sda1 8:1 1 1.9G 0 part
mmcblk0 179:0 0 58.3G 0 disk
|-mmcblk0p1 179:1 0 400M 0 part /boot
|-mmcblk0p2 179:2 0 4.9G 0 part /
`-mmcblk0p3 179:3 0 24.4G 0 part
Write the name of USB device where image have been placed (for example sda1)
mmcblk0p2 (write the name of device corresponding with root filesystem, where the image was downloaded, or the device containing the image, for example a usb drive)
========== List of files in the selected device ==========
total 508712
....
-rwxr-xr-x 1 root root 520823743 Feb 26 17:39 raspberry_domoticz_0x12345678.fsa
drwx------ 4 root root 4096 Feb 26 17:37 root
...
Write the image filename
raspberry_domoticz_0x12345678.fsa
========== List of attached devices: ==========
NAME MAJ:MIN RM SIZE RO TYPE MOUNTPOINT
sda 8:0 1 31.1G 0 disk
`-sda1 8:1 1 31.1G 0 part
mmcblk0 179:0 0 58.3G 0 disk
|-mmcblk0p1 179:1 0 400M 0 part /boot
|-mmcblk0p2 179:2 0 4.9G 0 part /mnt/img
`-mmcblk0p3 179:3 0 24.4G 0 part
Write the name of FLASH device to be written (example sdb)
sda (disk device connected to raspberry or PC, with the microSD card)
If you want to translate texts of raspberry_domoticz.sh in a different language, just modify the script adding the corresponding lines text[LANG,NUMBER] : it's very intuitive. Please send to
Access and configuring Raspberry with the programmed image
These are the default credentials for this image:
linux user: pi , password: arangingenni
linux user:root , password: geriandallse
domoticz user: domoticz , password: creasol
It's recommended to change these default passwords!!
Starting raspberry with this image, it will get network configuration from your DHCP server (router), so you can connect it by the browser at url like http://192.168.1.123:8080 (check your dhcp server to get the IP address assigned to raspberry, or do a network scan of your LAN). If you connect raspberry from 192.168.*.* or 172.16.*.* or 10.*.*.* networks, no authentication is required.
Also, ssh service is enabled, so you can enter secure shell (using ssh, putty or any other ssh client) as user pi or root.
How to create an image from Raspberry SD
We've written the bash script raspberry_domoticz.sh (see above) that permits to save a copy of Raspberry memory to a USB drive, and also create new SD with the content of a saved image.
This is useful because:
- flash memory cannot be written forever: normally each flash cell can be written up to 10000-100000 times. The proposed image is optimized to limit SD writes.
- it's always a good idea to have a backup of the running raspberry, so in case of problem it's possible to restore system from an old image
- maybe you need to clone an existing SD and keep images on your PC or NAS
Features:
- images are compressed... it's stupid to have a 16GB image for a 16GB almost-empty SD !!
- images can be restored on different SD sizes, so it's possible to use the same image to write SD card with 32GB size or 8 GB size as well
- creating and restoring an image is really fast, in comparison to other systems
Unfortunally, this system does not work in Windows, but... who are still using windows at these days? Everything is moving to Linux! Android is Linux. Rasbian is Linux. Your routers, access points, TV most probably use Linux operating system! ;-)
Click to download the raspberry_domoticz.sh script, save it to a executable directory on your linux system (e.g. /usr/local/sbin ) and give it the execute permissions.
Run raspberry_domoticz.sh and follow the instructions to create a compressed image from raspberry SD. It works also in live mode, directly from the working linux system, with a high probability of success.
Do you want more? Presentation of the highly reliable DomBus
Frequently Asked Questions FAQ
Some useful commands
ps ax |grep domoticz : lists all active processes showing only the ones with name domoticz
netstat -lnp |grep domoticz : shows the TCP/UDP ports used by domoticz (normally it uses the port 8080)
lsusb : lists devices connected to USB. lsusb -v shows details on USB devices
How to configure raspberry GPIOs
With this raspbian image, GPIOs can be configured editing /etc/rc.local file and setting the needed gpio as out (if output), in if input, or both if bidirectional.
[code]#/etc/rc.local file

#setting gpio using wiringpi tool:
#syntax: gpio export GPIONUMBER out|in|both to set as output, input or I/O
gpio export 24 out # Set as output.
gpio export 23 out
gpio export 22 out
gpio export 27 out
gpio export 18 out
gpio export 17 out
gpio export 25 out #lightOut2
gpio export 8 out #lightOut3
gpio export 7 out #lightOut4
gpio export 12 out #lightOut1[/code]
After edited, type /etc/rc.local to reload the script.
How to update the Creasol DomBus plugin to the latest version?
Just type, from root shell, the command creasoldombus_update.sh
How to configure a static IP for the Raspbian ethernet interface?
Edit the file /etc/dhcpcd.conf ( nano /etc/dhcpcd.conf ) and add the following lines at the end:
interface eth0
static ip_address=192.168.1.250/24
static routers=192.168.1.1
static domain_name_servers=192.168.1.1 8.8.8.8
and save with ctrl-x.
The raspberry cannot be connected by ssh (22 port) or http (8080 port)
Assure that LAN cable is connected to raspberry, and that a DHCP server can assign IP parameters to it.
There's a firewall script installed, /usr/local/sbin/myfirewallpi.sh , that needs that eth0 interface is already configured by DHCP or static IP.
How much does Raspberry PI4 consumes?
As home automation systems were borned to reduce building environmental footprint, it's important to know if a Raspberry is a good hardware for a domotic controller or not, in terms of CPU power, stability, and also energy consumption.
Searching in the www it's possible to find only few articles describing the power consumption of a Raspberry PI, so the best way is to measure the power consumption in practice.
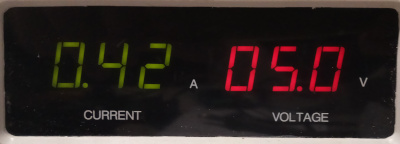
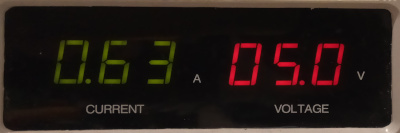
This is the hardware under test, a Raspberry PI4 with 1 GB of ram, connected to LAN and supplied by a DC power supply at 5V
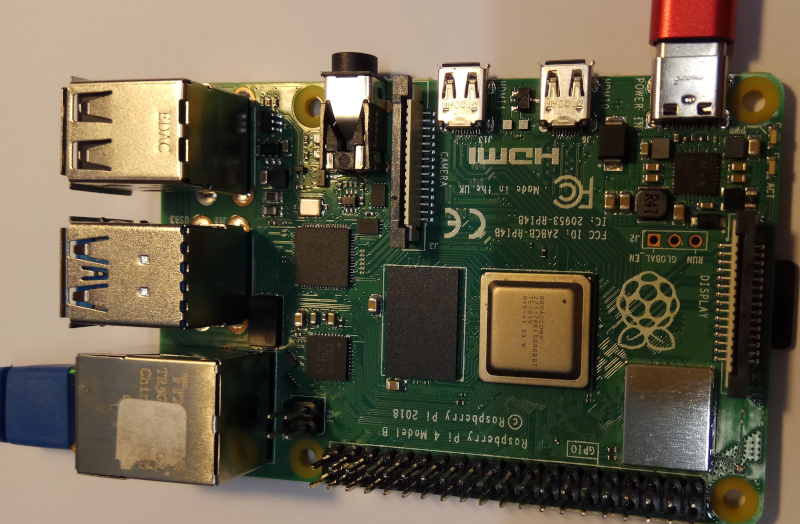
Below, the value of current and voltage with Raspbian O/S measured when
1. at the left, with no any load (very low CPU usage), raspberry power consumption = 5V*0.42A=2.1W normal
2. at the right, with 100% load on the 4 cores, raspberry power consumption = 5V*0.63A=3.15W peak
Firewall configuration
How to enable the IP number that you want to access your raspberry/domoticz from outside?
Edit the firewall script with command nano /usr/local/sbin/myfirewallpi.sh and modify the ADMIN_SOURCE variable adding the IP addresses (or networks) you want to enable:
ADMIN_SOURCE='80.86.145.56/29 149.13.157.0/24 37.0.0.0/8'
where /24 means that the last number in IP address can be any from 0 to 255, and /8 means that only the first number is checked while the remaing 3 numbers can be any from 0 to 255.
Save file with CTRL-s and CTRL-x , then run the script typing /usr/local/sbin/myfirewallpi.sh
How to enable incoming connections to the web server in Raspberry?
Modify the firewall script with command nano /usr/local/sbin/myfirewallpi.sh , and add port 80 (http) or 443 (https) to the variable TCP_SERVICES_IN_wan
then save script (CTRL-s and CTRL-x) and run the firewall script with command /usr/local/sbin/myfirewallpi.sh
Backup configuration
Configuration is stored in the file /usr/local/etc/backup.conf : edit it with your preferred editor (for example nano /usr/local/etc/backup.conf )
How to periodically create an image
Edit the DISKS variable:
DISKS="mmcblk0p1 mmcblk0p2"
to create an image for the boot and root partitions
How to export backup to an external USB hard drive?
BACKUP_DIR_CONTROL="/mnt/usb"
BACKUP_PARTITION_CHECK="/mnt/usb"
BACKUP_DIR="${BACKUP_DIR_CONTROL}/backup_domoticz"
BACKUP_DIR_MOUNT="mount -o nodev,noexec,async /dev/sda1 ${BACKUP_DIR_CONTROL}" # Mount /dev/sda1
BACKUP_DIR_UMOUNT="umount ${BACKUP_DIR_CONTROL}" # Umount /dev/sda1
BACKUP_DIR_AFTER_UMOUNT="hdparm -S12 /dev/sda" # Spinoff external hard drive
How to export backup on a NAS mounted by CIFS (Samba)?
BACKUP_DIR_CONTROL="/mnt/nas"
BACKUP_PARTITION_CHECK="/mnt/nas"
BACKUP_DIR="${BACKUP_DIR_CONTROL}/backup_domoticz"
BACKUP_DIR_MOUNT="mount -t cifs -o username=USER,password=PASSWORD, //NAS_IP_ADDRESS/SHARE ${BACKUP_DIR_CONTROL}" # Mount NAS partition
BACKUP_DIR_UMOUNT="umount ${BACKUP_DIR_CONTROL}" # Umount NAS partition
BACKUP_DIR_AFTER_UMOUNT="" # command sent after BACKUP_DIR_UMOUNT: do nothing