")
")
")
")
")
")

How to make your house smart using DomBus modules![]()

Strong reliability, Very low latency, Very very low power consumption: these are the features offered by DomBus modules, to make your house a smart home!
Nowadays always is wireless, but WiFi modules consumes too much, Zigbee/Thread has a poor range and need several mesh nodes: in any case with wireless devices you can expect devices to become unreachable.
Ethernet is much safe, but wiring is not easy: star connection with large switches to connect all devices.
To achieve the maximum reliability and very very low power consumption, DomBus modules use the industrial RS485 wired bus to communicate: with a 4 wires shielded cable (common alarm cable with 2*0.50mm² + 2*0.22mm² wires inside) it's possible to carry both data and 12Vdc power supply. RS485 can work with up to 1km of cable, using the terminating 100-150 Ohm resistors on the ends of the bus : you can find the terminating resistor in each DomBus module, and it should be enabled through the PCB jumper in the two furthest modules. RS485 allows connection with any network topology (star, linear, mixed), making it easy to connect multiple modules, obviously you need to install a thin cable!
Works locally (no cloud and internet connection is needed), no battery, no pain: zero latency and very strong security!
DomBus modules are really low power consumption, less than 15mW with no outputs active, so it's possible to supply dozens of modules with no problem. Also, DomBus31 module that has 8 relays, consumes only 600mW when all 8 relays are ON; DomBus36 module has 12 relay outputs consuming less than 750mW with all relays on; DomBus21 module has 3 latching relays with 15A capability (3kW), consuming only 15mW even with relays are ON! We believe that power optimization is important: many wifi modules consumes more than 1Watt each, but 1W means more than 8 kWh/year for each WiFi module!
How to build the home automation system
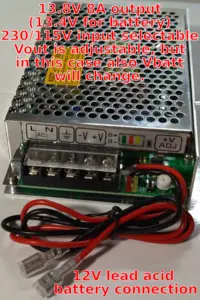
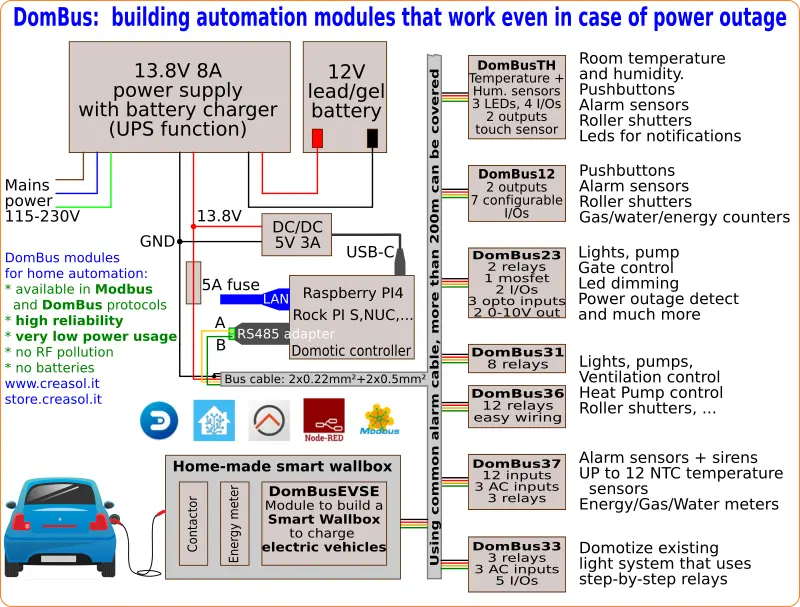
![12V power supply with UPS function]() Choose a reliable power supply for the bus: we suggest to use a 13.5V power supply unit with lead-acid battery charge feature. Power supply should be strong enough to supply domotic bus, network switches and routers, IPCams and NVR, ... , so the whole system can work even in case of power outage.
Choose a reliable power supply for the bus: we suggest to use a 13.5V power supply unit with lead-acid battery charge feature. Power supply should be strong enough to supply domotic bus, network switches and routers, IPCams and NVR, ... , so the whole system can work even in case of power outage.![Rock PI S single board computer for home automation systems]() Choose a low power domotic controller: for small system you can use Rock PI S , which consumes only 0.4W, or Raspberry PI that is powerful (more ram, higher CPU speed) that consumes 2.3W. Kits with ready to use operating system and software are available from store.creasol.it
Choose a low power domotic controller: for small system you can use Rock PI S , which consumes only 0.4W, or Raspberry PI that is powerful (more ram, higher CPU speed) that consumes 2.3W. Kits with ready to use operating system and software are available from store.creasol.it![Switching regulator 12-20Vin 5V 3A output for raspberry or rock pi s SBC]() Choose a reliable power supply for the domotic controller, if used: the best solution is a a DC/DC converter with Type-C or MicroUSB connector, supplied by the 13.5V power source, so the domotic controller is protected from blackout.
Choose a reliable power supply for the domotic controller, if used: the best solution is a a DC/DC converter with Type-C or MicroUSB connector, supplied by the 13.5V power source, so the domotic controller is protected from blackout.![USB to RS485 adapter converter for Modbus RTU and DomBus protocols]() Connect the domotic bus data to a RS485/USB adapter, and supply wires to the 13.5V power supply through a fuse. Use RS485 cables or, alternatively, common alarm shielded cables: 2x0.22mm² for data and 2x0.5mm² for Vbus supply. Connect the shield to GND only on one side.
Connect the domotic bus data to a RS485/USB adapter, and supply wires to the 13.5V power supply through a fuse. Use RS485 cables or, alternatively, common alarm shielded cables: 2x0.22mm² for data and 2x0.5mm² for Vbus supply. Connect the shield to GND only on one side.
If connection by wire is impossible, you can connect by RF/WiFi/LAN using the appropriate interface.![DomBusTH: temperature + humidity + touch sensor + 6 inputs/outputs]()
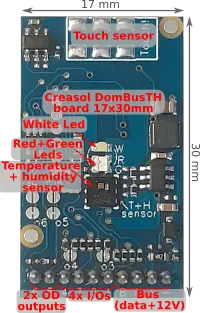
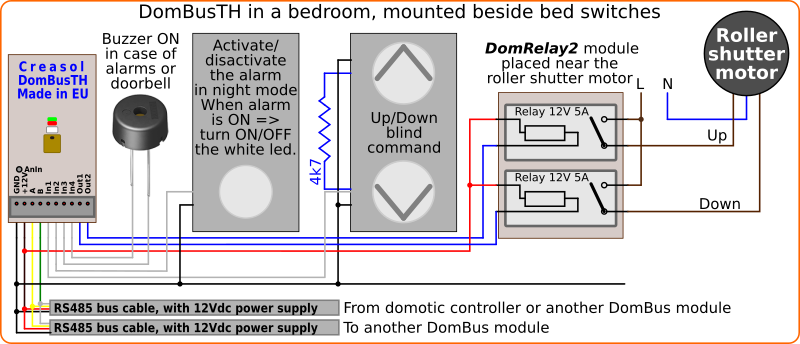
![DomBusTH module placed on a blank cover with hole in the centre]() In any room where you have to measure temperature and humidity, place a DomBusTH module: it is very compact and can be mounted on a blank cover with a 3-4mm hole in the center. It also has red/green leds (that can be used for notifications, like alarm on/off, import/export power, ...), white led (that can be used for notifications and as blackout emergency light), 1x analog input to monitor Vbus voltage, 4x I/Os (that can be connected to switches, pushbuttons, dual buttons, buzzer, energy/gas/water meters with pulsed output, alarm sensors, ...) and 2x open-drain outputs (that can be connected to the DomRelay2 module to get 2 relay outputs to command lights, roller shutter motors, appliances, ...).
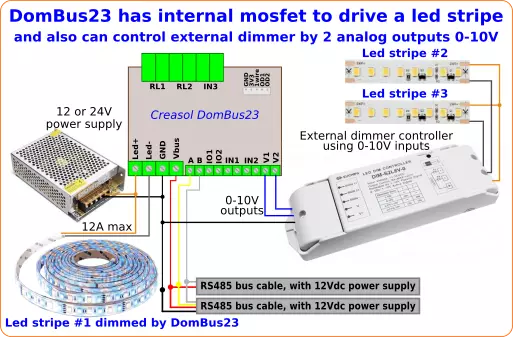
In any room where you have to measure temperature and humidity, place a DomBusTH module: it is very compact and can be mounted on a blank cover with a 3-4mm hole in the center. It also has red/green leds (that can be used for notifications, like alarm on/off, import/export power, ...), white led (that can be used for notifications and as blackout emergency light), 1x analog input to monitor Vbus voltage, 4x I/Os (that can be connected to switches, pushbuttons, dual buttons, buzzer, energy/gas/water meters with pulsed output, alarm sensors, ...) and 2x open-drain outputs (that can be connected to the DomRelay2 module to get 2 relay outputs to command lights, roller shutter motors, appliances, ...).![DomBus23 module with 2 relay outputs, 1 AC input, 1 mosfet output (dimmer), 2 I/Os, 2 low voltage AC inputs, 2 0-10V analog outputs]() If you need to interface a gate or garage door, you can use DomBus23 module, that has 2x relay outputs (to send open/close/pedestrian commands), 2x low voltage optoisolated inputs (to be connected to photocell power supply or 12/24V light indicating the gate state), 1x 115/230V optoisolated input (to be connected to 230V flash lamp, if needed to get status from this output, or can be used to monitor power outages). Also, DomBus23 has 1x 12-24V 10A mosfet output (can be used to supply a 12/24V led stripe, with dimming function), 2x analog outputs 0-10V (can be used to regulate the heat pump power, valve, or other appliances with 0-10V input, as like as other led dimming modules), and 2x I/Os.
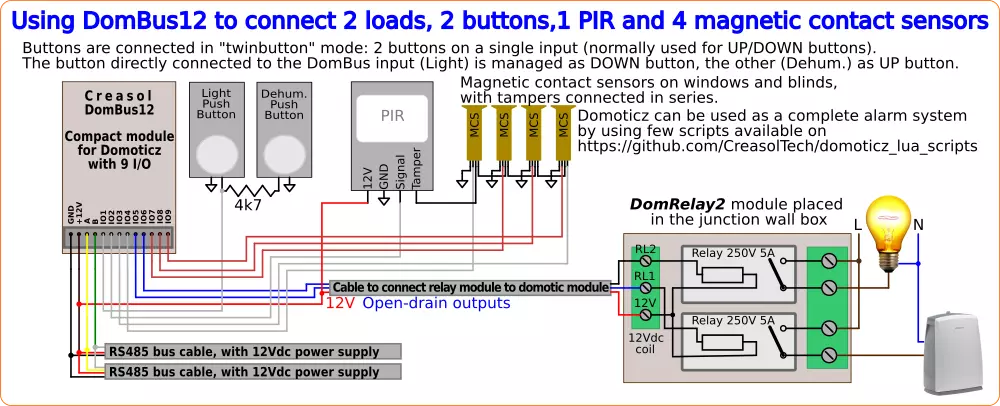
If you need to interface a gate or garage door, you can use DomBus23 module, that has 2x relay outputs (to send open/close/pedestrian commands), 2x low voltage optoisolated inputs (to be connected to photocell power supply or 12/24V light indicating the gate state), 1x 115/230V optoisolated input (to be connected to 230V flash lamp, if needed to get status from this output, or can be used to monitor power outages). Also, DomBus23 has 1x 12-24V 10A mosfet output (can be used to supply a 12/24V led stripe, with dimming function), 2x analog outputs 0-10V (can be used to regulate the heat pump power, valve, or other appliances with 0-10V input, as like as other led dimming modules), and 2x I/Os.![DomBus12 module with 9 I/O. 2 ports can be configured as output to drive external relay outputs.]() If you need several inputs for alarm sensors (magnetic contact sensors and PIRs), you can use the compact DomBus12 module that has 7x I/Os (configured as digital inputs, analog inputs, twinbuttons, counters, buzzer outputs, ...) + 2x open-drain outputs (that can be connected to external DomRelay2 module to get 2 relay outputs, or can be configured as digital inputs through PCB jumpers to have totally 9 inputs).
If you need several inputs for alarm sensors (magnetic contact sensors and PIRs), you can use the compact DomBus12 module that has 7x I/Os (configured as digital inputs, analog inputs, twinbuttons, counters, buzzer outputs, ...) + 2x open-drain outputs (that can be connected to external DomRelay2 module to get 2 relay outputs, or can be configured as digital inputs through PCB jumpers to have totally 9 inputs).![Domotic module with 12 inputs, 3 AC inputs, 3 relay outputs, designed for burglar alarm systems]() If you want to make a homemade alarm system and need more inputs and also some outputs, you can use DomBus37 module that has 12x low voltage inputs, 3 AC inputs (100-250Vac) and 3 relays outputs, or DomBus38 module that has 12x low voltage inputs, 4 SPDT relays, 2 relay and 1 AC input.
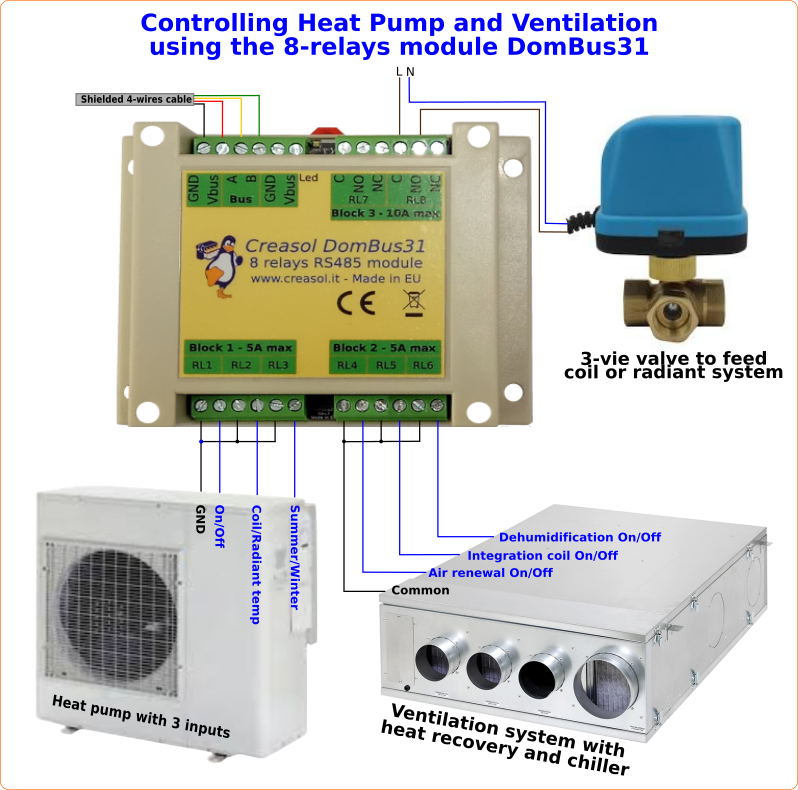
If you want to make a homemade alarm system and need more inputs and also some outputs, you can use DomBus37 module that has 12x low voltage inputs, 3 AC inputs (100-250Vac) and 3 relays outputs, or DomBus38 module that has 12x low voltage inputs, 4 SPDT relays, 2 relay and 1 AC input.- If you need several relay outputs, you can use DomBus31 module that has 6x relays with 5A 250V SPST capability and 2x relays with 10A 250V SPDT capability (terminal block with both normally-open and normally-closed outputs). This is very low power consumption module, that consumes less than 600mW with all 8 relays ON!
![12 relay output module for home automation system, Modbus or DomBus protocols]() If you need more relays, we have DomBus36 module that has 12 relay outputs in 3 groups: 1 common + 4 relays for each group, to get easy and quick wiring, consuming less than 750mW with all 12 relays ON!
If you need more relays, we have DomBus36 module that has 12 relay outputs in 3 groups: 1 common + 4 relays for each group, to get easy and quick wiring, consuming less than 750mW with all 12 relays ON!- If you need to control high power appliances with up to 3kW power, you can use DomBus21 module: it has 3 latching relays with 15A capability, 1 AC input (to monitor 230V presence, and also as a zero-cross detector to switch ON/OFF relays preventing overcurrent and overvoltage) and 4 low voltage inputs (for pushbuttons, switches, meters, temperature probes, ...)
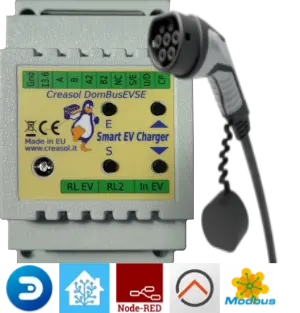
![EVSE module to build a homemade wallbox DIY to charge electric vehicles. Using Modbus or DomBus protocols]() Use DomBusEVSE module to charge the electric car: you can select how much power to get from the grid, from 0% (use only photovoltaic power) to 100% (use all available power) preventing overloads and disconnections. This is a full features charging system: for example it has the EVMINVOLTAGE feature that permit to charge the electric vehicle with the minimum power needed to keep voltage below 253V (preventing solar inverter derating).
Use DomBusEVSE module to charge the electric car: you can select how much power to get from the grid, from 0% (use only photovoltaic power) to 100% (use all available power) preventing overloads and disconnections. This is a full features charging system: for example it has the EVMINVOLTAGE feature that permit to charge the electric vehicle with the minimum power needed to keep voltage below 253V (preventing solar inverter derating).- Any energy, gas or water meter with pulsed output can be connected to DomBus12, DomBus21, DomBus23, DomBus32 and DomBus33, DomBus37, DomBus38 and DomBusTH I/Os.
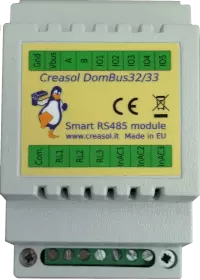
![Din Rail domotic module with 3 relays, 3 AC inputs, 5 I/Os.]() Use DomBus33 module to manage a light system that uses pushbutton switches that activate step-by-step relays: DomBus33 permits to know the status of the light and control the step-by-step relay coils to toggle, switch on and switch off lights, with the ability to have a button to switch all lights off (or a simple automation that switch off lights when alarm is activated in AWAY mode).
Use DomBus33 module to manage a light system that uses pushbutton switches that activate step-by-step relays: DomBus33 permits to know the status of the light and control the step-by-step relay coils to toggle, switch on and switch off lights, with the ability to have a button to switch all lights off (or a simple automation that switch off lights when alarm is activated in AWAY mode).
 Choose a reliable power supply for the bus: we suggest to use a 13.5V power supply unit with lead-acid battery charge feature. Power supply should be strong enough to supply domotic bus, network switches and routers, IPCams and NVR, ... , so the whole system can work even in case of power outage.
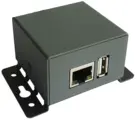 Choose a low power domotic controller: for small system you can use
 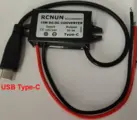 Choose a reliable power supply for the domotic controller, if used: the best solution is a a DC/DC converter with Type-C or MicroUSB connector, supplied by the 13.5V power source, so the domotic controller is protected from blackout.
 Connect the domotic bus data to a RS485/USB adapter, and supply wires to the 13.5V power supply through a fuse. Use RS485 cables or, alternatively, common alarm shielded cables: 2x0.22mm² for data and 2x0.5mm² for Vbus supply. Connect the shield to GND only on one side.
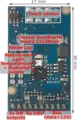
 In any room where you have to measure temperature and humidity, place a
 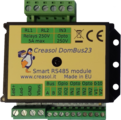 If you need to interface a gate or garage door, you can use
  If you need several inputs for alarm sensors (magnetic contact sensors and PIRs), you can use the compact
 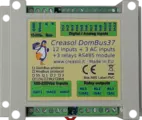 If you want to make a homemade alarm system and need more inputs and also some outputs, you can use
 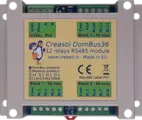 If you need more relays, we have
 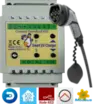 Use
Use  Use
Use If you're renovating your house don't forget to:
- install magnetic contact sensors on windows, doors, blinds, external and internal sirens, external PIRs or RF radars: using Domoticz, Home Assistant, ... it's possible to build a complete alarm system with full notifications (text, pictures, small videos) in Telegram
- install at least one IP cam oriented to the main gate , so you can receive a picture in your smartphone (Telegram) when somebody push the door bell button,
- do not install thermostats to control room temperature: it's much better to install temperature sensors in each room (DomBusTH module) and let the domotic controller to controls the heater or heat pump : in this way it's possible to overheat (in Winter) or overcool (in Summer) the house when extra power is available from photovoltaic
- use DomBusEVSE to charge electric vehicles (DIY wallbox) and DomBusTracker2 to control a single or dual axis sun tracker in the garden.
For any questions please contact us by DomBus Telegram group https://t.me/DomBus , Whatsapp or by email to
DomBus or Modbus protocol?
DomBus modules are provided with two protocols of your choice:
- DomBus protocol, very powerful multimaster protocol that works only with Domoticz controller by installing its python plugin, and Home Assistant, OpenHAB, Node-RED, ... by using the DomBusGateway bridge (software daemon, Home Assistant App or hardware module).
DomBus protocol permit to get zero latency and DCMD functions: commands exchanged between modules, like KNX®, that permit to make simple automations that work even if the domotic controller is OFF. - Modbus RTU standard protocol that works with almost any home automation system, and it designed for custom applications or to work with industrial systems.
Some application notes

Using DomBus modules with Domoticz
- In Domoticz, install the Creasol DomBus plugin, if not already done, from GitHub or from Python Plugin Manager
- Connect this DomBus module to the domotic controller by a simple RS485/USB adapter (the preferred reliable solution), or by a RS485/net module or radio interface . Please note that more DomBus modules can be connected together to the same bus. Also, it's possible to manage more DomBus buses, for example one for each floor.
It's recommended to supply each bus at 13.8V, with a backup battery, to get a home automation system working even in case of blackout; protect the bus with a fuse (1A or more, depending how many devices are connected).
Assure that termination resistor is connected/enabled in each bus end (two 120 Ohm resistors for each bus); DomBus modules already have a termination resistor that can be enabled by a solder iron. - Check in the Switches panel for the new device, edit it, and in the description field add the following "command"
,HWADDR=0x0101
or similar to program the module with a new, unique, address between 0x0001 and 0xfeff (hexadecimal format), then save - Reload the Switches panel: all device ports will be added automatically and will be ready to use.
DomBus modules with Home Assistant
- You have three ways to get DomBus modules working with Home Assistant (or other controllers supporting MQTT with AutoDiscovery):
- By using the DomBusGateway app (ready-to-use add-on for HAOS or HA Supervised)
- By using the DomBusGateway bridge (python software)
- By using the DomBusGatewayPIS hardware
- Use the DomBusGateway system you prefer: DomBusGateway is a bridge between the DomBus network and any home automation system supporting MQTT; moreover, thanks to AutoDiscovery, all entities will be created automatically.
- Enable MQTT integration in Home Assistant
- Connect this DomBus module to the domotic controller (or DomBusGatewayPIS hardware) by a simple RS485/USB adapter (the preferred reliable solution), or by a RS485/net module or radio interface . Please note that more DomBus modules can be connected together to the same bus. Also, it's possible to manage more DomBus buses, for example one for each floor.
It's recommended to supply each bus at 13.8V, with a backup battery, to get a home automation system working even in case of blackout; protect the bus with a fuse (1A or more, depending how many devices are connected).
Assure that termination resistor is connected/enabled in each bus end (two 120 Ohm resistors for each bus); DomBus modules already have a termination resistor that can be enabled by a solder iron. - If more devices of the same type must be connected, it's recommended to modify the module address: connect DomBusGateway by telnet (port 8023) then type the commands
showbus (list the modules attached to the bus)
showmodule ff32 (specify the address of the module you wan to configure)
setport 1 hwaddr=101 (to set the device hardware to the new, unique value 101: valid address from 1 to efff, hex format)
You'll find the new device, with that address, in the MQTT integration and in the dashboard, with all entities already available.
DomBus modules with Node-RED, OpenHAB, ioBroker and other system supporting MQTT
Please check previous section, dedicated to Home Assistant: DomBus devices can be managed by any system supporting MQTT by using the bridge DomBusGateway: a python daemon running in background, or a dedicated hardware (Rock PI S) running DomBusGateway software.
Systems that support AutoDiscovery automatically detect all entities (ports) of the DomBus module.
A telnet interface on DomBusGateway permits to make some customization, for example device hardware setting, port configuration, ...
Using DomBus modules with Modbus protocol
As said, DomBus modules are available in two versions:
- supporting Modbus protocol: this is a standard master/slave protocol that can be useful in some cases, for example to manage relay outputs, inputs that do not change frequently, sensors, DomBusEVSE module (to build a EV charging station), DomBusTracker2 (to control a single/dual axis solar tracker), ...
- supporting DomBus protocol: this is a proprietary protocol, low latency, that also permits to exchange commands between modules (called DCMD) to realize simple automations that work even in case that the domotic controller is down. This is the preferred protocol, expecially when alarm sensors are needed.
If Modbus firmware is needed, it's possible to configure DomBus modules using the proper Modbus registers: check the page of each module to list the Modbus registers.