")
")
")
")
")
")
Open your garage door, gate, ... by using the highbeam head light lever, instead of searching for the remote control in your bag!
It's able to copy up to 4 remote controls, fixed code, 433 and 868 MHz.
Please check the English page to see the most updated version!
Applications
- In a vehicle, permits to open up to 4 different automations (gate, barrier, garage door, ...) by using the high beam headlight lever, or brake pedal. No need to seek for a remote control while approaching your house or work!
- Sends up to 4 different codes by using a simple button, used to send power supply (9÷24V) to the device
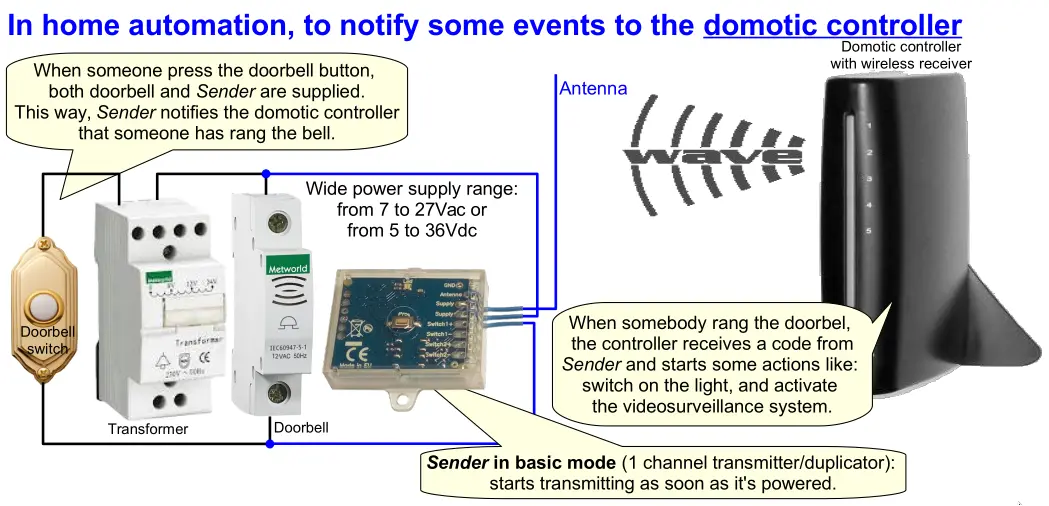
- Activate a receiver when another device is supplied: for example, when the door bell is pushed (12V to the bell), this device is supllied and transmit a signal that is read by the home automation system or another receiver. In this case, only 1 channel is supported.
- Connect a 8÷35Vdc power supply and up to 4 external buttons to control up to 4 automations, as this is a remote control duplicator for fixed code remote controls.
Features
- Independent channels: every channel may transmit a different code type in a different frequency
- Transmit fixed codes with OOK modulation.
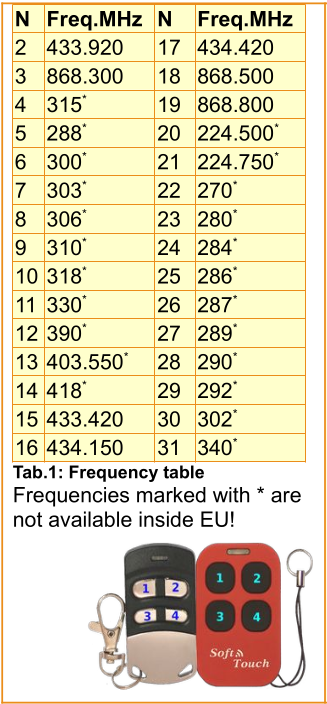
- Selectable frequency: 433.920 or 868.300 MHz. Outside EU it's possible to use other frequencies
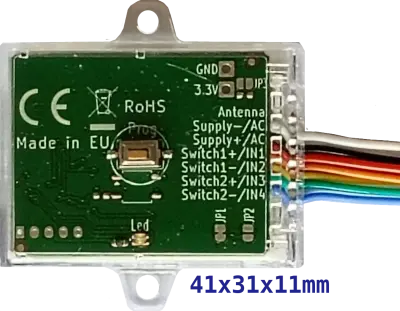
- Two wires for the power supply (8÷35Vdc and 9÷24Vac) + 1 wire for antenna: cut down to 17cm for 433 MHz or 8cm for 868MHz
- High efficient switching mode DC/DC converter, to reduce power consumption and dissipation
- Transmission power can be configured to the minimum value that reduces interferences and collisions
- Very compact: 41x31x11cm
- The frequency, transmission power and other parameters, can be simply programmed using the Prog buttonFre (that can be pushed without opening the housing).
Working modes
Mode 1 (basic mode): when the device is supplied, it starts transmitting the channel 1 code. This mode is suitable when device is connected to a button or a relay output so, when active, we want that this device transmits a code to activate a receiver on another side. Only 1 channel is available in this mode
Mode 2 (button mode): in this case the device is connected to the power supply unit by a button, with the ability to transmit up to 4 different codes (4 channels).
Pushing the button for a long time it transmits channel 1.
1 short + 1 long pulse to transmit channel 2.
2 short + 1 long pulse to transmit channel 3.
3 short + 1 long pulse to transmit channel 4.
Mode 3 (car mode): this working mode is suitable when the device is used in a vehicle, connected to the high beam headlight lever or brake light: normally, the device is placed in the fuse box of the vehicle.
1 short + 1 long pulse to transmit channel 1.
2 short + 1 long pulse to transmit channel 2.
3 short + 1 long pulse to transmit channel 3.
4 short + 1 long pulse to transmit channel 4.
Mode 4 (External buttons mode): 1 to 4 buttons can be connected to IN1, IN2, IN3, IN4, using GND as common for buttons, and use a DC voltage source for the power supply (8÷35Vdc). Device consumes about 18mW in standby, and up to 4 power level can be selected. In this way it's possible to realize a keyboard to control up to 4 different automations, using fixed code remote controls. See section below for full explanation.

Installation in a vehicle and configuration
Installation must be done by a qualified technician.
First, check that the remote control to copy is compatible with Creasol_Sender:
- Connect Supply wires to any 12 or 24V power supply unit or battery.
- Set device in "car mode", setting parameter 9 to 3: push PROG button 9 times, wait for led flashing, then push PROG button 3 times
- Set the transmitting frequency for channel 1: push PROG button 1 (selecting channel 1: led goes solid green), then push PROG button 5 times (frequency parameter: led will start flashing a number of times corresponding to the current frequency), then push PROG button a number of times corresponding to the needed frequency (2 for 433.92MHz, 3 for 868.3 MHz).
- Copy the existing remote control: push PROG button 1 time (to select channel 1), then push PROG button 2 times (to start receiving the code from the original remote control): led starts flashing slowly. Within 10 seconds push the button on the original remote control: green led will emit 2 flashes (code has been copied) or 4 flashes (rolling code: in this case most probably Creasol-Sender will not work).
- Test the programmed channel, simulating a short highbeam flash followed by a long flash: remove power supply for few seconds, then connect power supply for less than half second, remove for less than half second, then connect power supply again for few seconds: the red led flashes while transmitting, so it's possible to verify that the automation (gate, garage door, ...) is activated by Creasol-Sender.
- If the transmission time is too short, increase parameter: push PROG button 1 time (to select channel 1), then push PROG 6 times (parameter 6: led will flash N times indicating the current value), then push PROG button 7 or 8 times to increase the transmission time.
If other channels should be programmed, repeat steps 3-6 selecting the right channel: 2, 3 or 4 instead 1.
If CreasolSender is compatible with your automation (was able to activate the automation, at step 5),
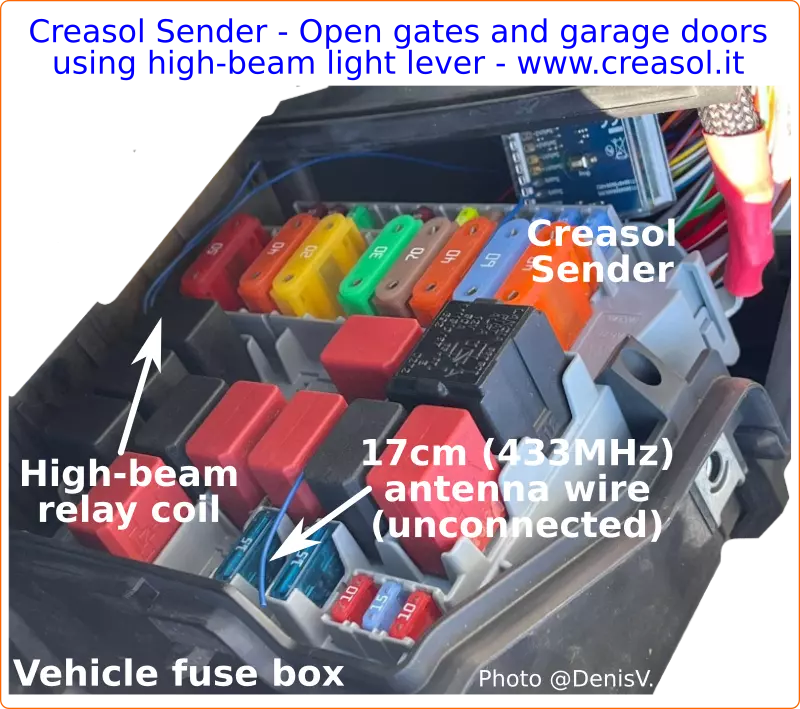
- Cut the antenna wire to 17cm for 433 MHz, or 8cm for 868 MHz.
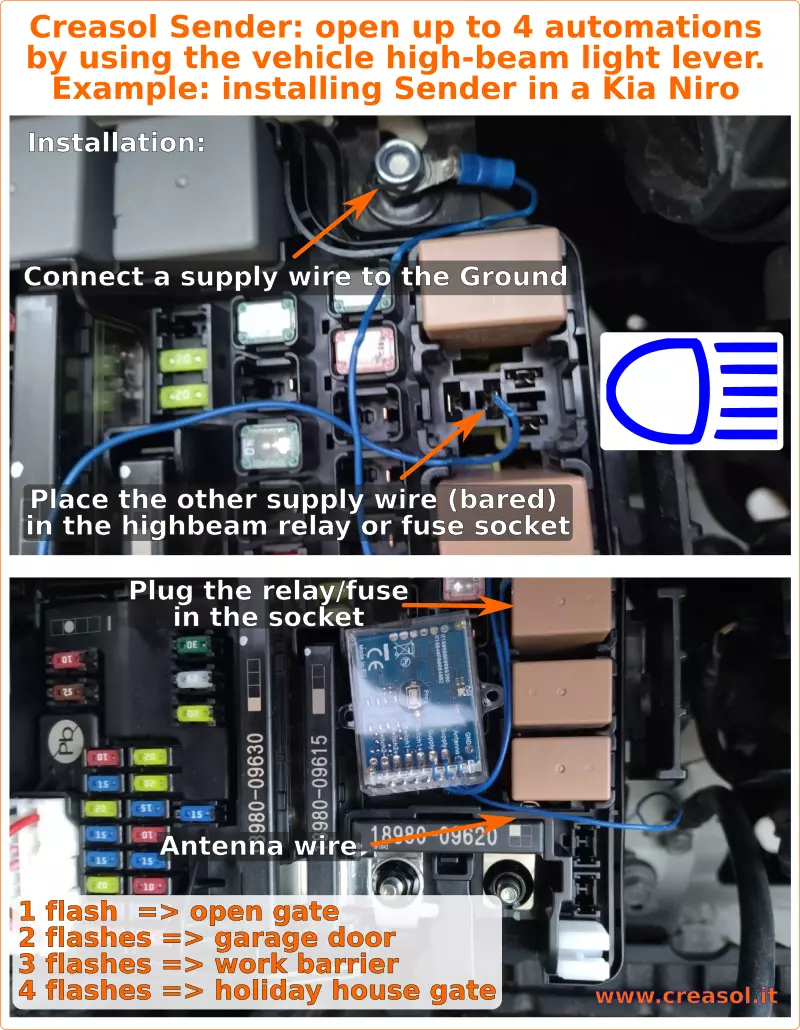
- Check the vehicle manual to find the fuse box with the high-beam light fuse or relay. Place the device into the fuse box (or in another appropriate protected enclosure), and connect one Supply wire to the highbeam fuse or relay coil, or connect the other Supply wire to the ground (vehicle chassis). Supply voltage should be in the range 6-35V. Assure that power supply to CreasolSender is not applied when highbeam are OFF.
Take care about connection: use a fuse tap device, or alternatively remove the fuse or relay, place the bare wire in the fuse/relay holder, and plug the fuse/relay again, making connection carefully!! This operation must be done by a technician!
Now it's possible to test the device. Take a short high-beam flash followed by a long flash to transmit channel 1: the last flash must be at least 1 second long, to supply Creasol-Sender enough to transmit the code and let the automation (gate, barrier, ...) decoding the transmitted data.
To transmit the code associated to channel 2, take 2 short flashes followed to a long flash. Similarly for channels 3 and 4.
Keyboard controlling from 1 to 4 automations
CreasolSender has the ability to be connected to 4 external pushbuttons to transmit up to 4 different fixed code. In case that a rolling code automation have to be controlled, an additional receiver (like UniRec1) have to be connected to that automation.
- Connect a 8÷35Vdc power source to red and black wires (red=positive, black=negative)
- Connect button #1 between orange and black wires
- Connect button #2 between yellow and black wires, if needed
- Connect button #3 between green and black wires, if needed
- Connect button #4 between blue and black wires, if needed
- Configure device to work in Mode4: push Prog button 9 times (operation mode), wait for led showing current settings, then push Prog button 4 times to select External buttons mode
- For each channel, program the frequency if different from 433.92MHz: push button a number of times corresponding to the selected channel (from 1 to 4), then push button 5 times (frequency), then push button 2 times for 433.92MHz, 3 times for 868.3 MHz, ...
- Copy the original remote control: push button a number of times corresponding to the channel, wait for led going solid on, then push button twice to start copying procedure; led starts flashing slowly, and within 5 second start transmitting the code from the original remote control to copy it: if procedure ends correctly, the led will flash twice.
- Repeat steps 6,7,8 for other channels that have to be programmed.
Device is supplied in nice transparent-recyclable clamshell with instructions printed in more languages. Companies that would like to purchase this product can send an email to
Documentation
Application notes
Using Creasol-Sender in a vehicle (car, van, bike, ...) to open gates, garage doors and traffic barriers by high-beam light flashing
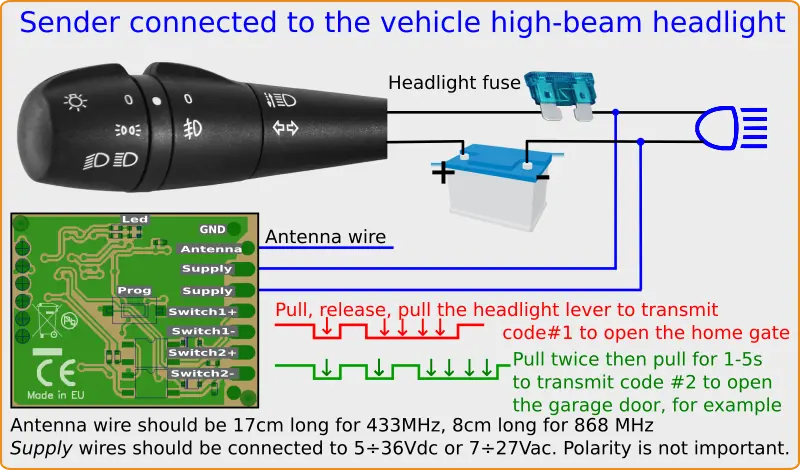
In this application, Creasol-Sender is supplied by the high-beam lever of the vehicle to command up to 4 automations (garage doors, gates, barriers, ...):
- 1 short flash + long flash => transmits channel 1 (to open, for example, the home gate)
- 2 short flashes + long flash => transmits channel 2 (to open, for example, home garage door)
- 3 short flashes + long flash => transmits channel 3 (to open, for example, traffic barrier at work)
- 4 short flashes + long flash => transmits channel 4 (to open, for example, holiday house gate)
This is a very easy and safe solution to open automations from your car, truck or motorcycle, without getting distracted searching the remote control. Please note that Creasol-Sender is able to copy only fixed code remote control: if your automation uses a rolling code remote controls, you have to add a universal receiver, like Creasol UniRec1 or UniRec2, to that automation.
Installation in a vehicle
Installation must be done by a qualified technician.
First, check that the remote control to copy is compatible with Creasol_Sender:
- Connect Supply wires to any 12 or 24V power supply or battery.
- Set parameter 9 to 3 to set "car mode": push PROG button 9 times, wait for led flashing, then push PROG button 3 times
- Set frequency for channel 1: push PROG button 1 (selecting channel 1: led goes solid green), then push PROG button 5 times (frequency parameter: led will start flashing a number of times corresponding to the current frequency), then push PROG button a number of times corresponding to the needed frequency (2 for 433.92MHz, 3 for 868.3 MHz).
- Now copy the existing remote control: push PROG button 1 time (to select channel 1), then push PROG button 2 times (to start receiving the code from the original remote control): led starts flashing slowly. Within 10 seconds push the button on the original remote control: green led will emit 2 flashes (code has been copied) or 4 flashes (rolling code: in this case most probably Creasol-Sender will not work).
- To test the programmed channel, remove power supply for few seconds, then connect power supply for less than half second, remove for less than half second, then connect power supply again for few seconds: the red led flashes while transmitting, so it's possible to verify that the automation (gate, garage door, ...) is activated by Creasol-Sender.
- If the transmission time is too short, increase parameter: push PROG button 1 time (to select channel 1), then push PROG 6 times (parameter 6: led will flash N times indicating the current value), then push PROG button 7 or 8 times to increase the transmission time.
If other channels should be programmed, repeat steps 3-6 selecting the right channel: 2, 3 or 4 instead 1.
If CreasolSender is compatible with your automation (was able to activate the automation, at step 5),
- Cut the antenna wire to 17cm for 433 MHz, or 8cm for 868 MHz.
- Check the vehicle manual to find the fuse box with the high-beam light fuse or relay. Place the device into the fuse box (or in another appropriate protected enclosure), and connect one Supply wire to the highbeam fuse or relay coil, or connect the other Supply wire to the ground (vehicle chassis). Supply voltage should be in the range 6-35V. Assure that power supply to CreasolSender is not applied when highbeam are OFF.
Take care about connection: use a fuse tap device, or alternatively remove the fuse or relay, place the bare wire in the fuse/relay holder, and plug the fuse/relay again, making connection carefully!! This operation must be done by a technician!
Now it's possible to test the device. Take a small high-beam flash followed by a long flash to transmit channel 1: the last flash must be at least 1 second long, to supply Creasol-Sender enough to transmit the code and let the automation (gate, barrier, ...) decoding the transmitted data.
To transmit the code associated to channel 2, take 2 short flashes followed to a long flash. Similarly for channels 3 and 4.
Activate a remote load/light when someone push the door bell button (or another button)
The following diagram shows a solution to remote control a light or something else when someone push a button, using a long range wireless connection at 433 or 868 MHz.

Door bell connected to a domotic controller
The following picture shows how to connect Sender in basic mode (Mode 1) so, when it's supplied by a button, it immediately starts transmitting a code to activate a remote device (a domotic controller with integrated receiver, for example, or another device with additional receiver).
Installation
- Connect Supply wires to any 12 or 24V power supply or battery.
- Set parameter 9 to 1 to set "basic mode": push PROG button 9 times, wait for led flashing, then push PROG button 1 time
- Set frequency for channel 1: push PROG button 1 (selecting channel 1: led goes solid green), then push PROG button 5 times (frequency parameter: led will start flashing a number of times corresponding to the current frequency), then push PROG button a number of times corresponding to the needed frequency (2 for 433.92MHz, 3 for 868.3 MHz).
- Now copy the existing remote control: push PROG button 1 time (to select channel 1), then push PROG button 2 times (to start receiving the code from the original remote control): led starts flashing slowly. Within 10 seconds push the button on the original remote control: green led will emit 2 flashes (code has been copied) or 4 flashes (rolling code: in this case most probably Creasol-Sender will not work).
- To test the programmed channel, remove power supply for few seconds, then connect power supply again: the red led flashes while transmitting, so it's possible to verify that the automation (gate, garage door, ...) is activated by Creasol-Sender.
- If the transmission time is too short, increase parameter: push PROG button 1 time (to select channel 1), then push PROG 6 times (parameter 6: led will flash N times indicating the current value), then push PROG button 6÷8 times to increase the transmission time.
Note: in basic mode, only 1 channel is supported.
If CreasolSender is compatible with your automation (was able to activate the automation, at step 5),
- Cut the antenna wire to 17cm for 433 MHz, or 8cm for 868 MHz.
- Connect the Supply wires of CreasolSender as indicated in the schematic above
Remote controls compatible with Creasol Sender and Creasol SenderBatt
Cannot find your remote control in the Compatible and Incompatible tables below?
Please send a message by Telegram or Whatsapp to +393283730010 including remote control pictures, brand and model.
| Company | Frequency | Models | Photo | Frequency value (cmd=5) | Notes |
| ADYX | 433.920 | ALIZE EM2C, ALIZE EM4C | 2 | ||
| AETERNA | 433.920 | TX433 1,2,4 buttons |  |
2 | |
| ALLMATIC | 306.000 | ALLMATIC ASMX2, ASMX4 |  |
8 | Original remote controls may be not stable in frequency |
| 433.920 | ALLMATIC AEMX1, AEMX2, AEMX4 |  |
2 | ||
| EUROPE AUTO ARMY1, ARMY2, ARMY4 | 2 | ||||
| ALLMATIC MX1, MX2, MX4 |  |
2 | |||
| ALLTRONIK | 433.920 |
S429_1, S429_2, S429_4, S429_M Be sure that your remote operates at 433.92MHz! |
2 | ||
| S425 | 2 | ||||
| ANSONIC | 433.920 | SA 434-1E, SA434-2E, SA434-3E, SA434-4E |
2 | ||
| SA 434-1MINI, SA434-2MINI, SA 434-2Midi | 2 | ||||
| 868.350 | SA 868-1E, SA 868-2E, SA868-3E, SA868-4E | 3 |
|||
| SA 868-1mini/M, SA 868-2mini/M (dip switch version) | 3 |
||||
| APERTO | 433.920 | CPS1, CPS2, CPS |
 |
2 | |
| AVIDSEN | 433.920 | 100601 micromark MM23164 |  |
2 | |
| 104505 |  |
2 | |||
| 100951, 100955, 100550, 100400 | 2 | ||||
| BANDY | 433.920 |  |
2 | Not sure it work, because this is a duplicator: check the original remote control | |
| BELFOX | 433.920 | DHS433-1, DHS433-2, DHS433-4, dip switch version |  |
2 | |
| DHS 433,92 (7733), dip switch version | 2 | ||||
| 868.350 | DHS 868,3, dipswitch version | 3 |
|||
| HS 868-20 | 3 |
||||
| BENINCA' | 306.000 | LOT1A, LOT2A, LOT4A |  |
8 | Original remote controls may be not stable in frequency |
| LOTX1A, LOTX2A, LOTX4A |  |
8 | Original remote controls may be not stable in frequency | ||
| LO.TX2PS |  |
8 | Original remote controls may be not stable in frequency | ||
| 433.920 | LOT1W, LOT2W, LOT4W |  |
2 | ||
| LOT2WMS |  |
2 | |||
| T2WK, T4WK |  |
2 | |||
| LOTX1W, LOTX2W, LOTX4W | 2 | ||||
| TO.GO2WP, TO.GO4WP, TO.GO2WK, TO.GO4WK | 2 | ||||
| BERNER | 868.300 | Berner BHS140 | 3 | Firmware Rev.03c or later | |
| Berner BHS130 | 3 | Firmware Rev.03d or later | |||
| BESIDE | 433.920 | BEZAP |  |
2 | |
| HIT |  |
2 | |||
| BETA ELETTRONICA | 315.000 |
BETALARM 6500 |
 |
4 | Original remote controls may be not stable in frequency |
| 330.000 | BETALARM 5500 |  |
11 | Original remote controls may be not stable in frequency | |
| BFT | 306.000 | RCS |  |
8 | Original remote controls may be not stable in frequency |
| 315.000 | VTM1, VTM2, VTM4 |  |
4 | Original remote controls may be not stable in frequency | |
| 418.000 | GT01, GT02, GT04 |  |
14 | ||
| 433.920 | TE01, TE02 ( TEO1, TEO2 ) |  |
2 | ||
| TE04 ( TEO4 ) | |
2 | |||
|
BFT MITTO 2, MITTO 4, MITTO-2A, BFT MITTO-4A, MITTO-2M, MITTO-4M |
 |
2 | |||
| BOSS Openers STEEL-LINE Automation Centurion Guardian |
303.000 | BOSS HT4 6211-L 1,2 and 4 buttons, Boss BHT4, Boss HT3 blue led, Guardian 2211-L, Centurion 2211L, LYNX 2211L, MODERN 2211L 1 and 2 BUTTONs, STEEL-LINE 2211L 1, 2 and 4 BUTTON, STEEL-LINE HT3 BLUE LED, Garage Door Openers BRD1, BRD2, BRD3, BRD4, BRD9, RD1, RD2, RD3, RD4, RD9, BOL4, BOL5, BOL6, BOL9, OL4, OL5, OL6 |  |
7 | Only versions from March 2017: ask for confirmation |
| BREDA | 433.920 | Breda TOP432SA | Like CAME TOP432SA, blue | 2 | |
| CAME | 315.000 | Came T312M, T314M | 4 | Original remote controls may be not stable in frequency | |
| Came TOP312, TOP314 | 4 | ||||
| Came TOP312NA, TOP314NA | 4 | ||||
| 433.920 | Came T432, T434 Came TOP432A, TOP434A, TOP432, TOP432NA, TOP434NA, Came Came TAM432, TAM434, TAM438 |
 |
2 | ||
| Came TOP432M, TOP434M | 2 | ||||
| Came TAM432SA |  |
2 | |||
| Came TOP432SA |  |
2 | |||
| Came TOP432NA, TOP434NA |
 |
2 | |||
| Came TWIN2, TWIN4 | 2 | ||||
| CAME TOP-432EE, CAME TOP434EE |  |
2 | Note that this remote control can be programmed to generate a fixed code or a rolling code. Duplication works only if programmed as fixed code! | ||
| CAME TOP-432EV, TOP-434EV |  |
2 | |||
| 868.350 | CAME TOP862NA, Came TOP864NA | 3 | |||
| CARDIN | 300.000 | S300 |  |
6 | Original remote controls may be not stable in frequency |
| 310.000 | S301, S302 | |
9 | Original remote controls may be not stable in frequency | |
| 433.920 | S476 TX2, S476TX4 |  |
2 | ||
|
CASALI |
330.000 |  |
11 | Original remote controls may be not stable in frequency | |
| 433.920 | Genius 433 2, Genius 433 3, JA400 TM433, JA401 TM433 |  |
2 |
||
| CASIT | 306.000 | ERTS92B, ERTS92T |  |
8 |
Original remote controls may be not stable in frequency |
| 433.920 | ERTS92B, ERTS92T |  |
2 |
||
| ERTS20DB, ERTS20DQ |  |
2 |
|||
| ERTS476D, ERTS476Q |  |
2 |
|||
| TXS1, TXS2, TXS3, TXS4, TXS6 ERTS97B, ERTS97T |
2 |
||||
| CEDAMATIC | 433.920 | Cedamatic AEMX4, AEMX2, AEMX1 | |
2 | |
| CELINSA | 433.920 | S10 1, S10 2, SAW1, SAW2 |  |
2 |
|
| CENTURION | 433.920 | CLASSIC, SMART, SMART2 |  |
2 |
|
| CHAMBERLAIN LIFTMASTER MOTORLIFT SEARS CRAFTSMAN |
300.000 | Chamberlain 300MC (multicode) | Not supported yet! |
||
| 315.000 | 333LM | Not supported yet! |
|||
| 360LM, 362LM, 363LM | Not supported yet! | ||||
| 390.000 | 50CB, 53CB, 750CB, 753CB, 50LM, 53LM, 61LM, 62LM, 63LM, 139.53100, 139.53110, 139.53200, 139.53210 | Not supported yet! | |||
| 54CB, 756CB, 54LM, 64LM, 859CB |  |
Not supported yet! | |||
| 850CB, 853CB, 959CB, 81LM, 82LM, 83LM, 84LM, 99LM |
Not supported yet! | ||||
| 33LM | Not supported yet! | ||||
| 418.000 | 4180, 4182, 4183 | Not supported yet! | |||
| 4185 | Not supported yet! | ||||
|
787 remote
less entry |
Not supported yet! | ||||
| 433.920 | 4330E, 4332E, 4333E | Not supported yet! | |||
| 4335E | Not supported yet! | ||||
| CPS | 433.920 | TCP3, CPS, Jolly 4 |  |
2 |
|
| CPS1 TCP3, CPS2 TCP3, CPS4 TCP3 EM1CV, EM2CV, EM4CV |
|
2 |
|||
| DASPI | 433.920 | Daspi Happy2 433, Daspi Pops2 |  |
2 |
|
| Daspi Zero2, Zero2CLO, Zero4CLO | 2 | ||||
| DEA | 306.000 | 306 1, 306 2, 306 4 |  |
8 |
Original remote controls may be not stable in frequency |
| 306 |  |
8 |
Original remote controls may be not stable in frequency | ||
| 433.920 | 433 1, 433 2, 433 4, Gold S1, Gold S2 Dea Gold 238 S1, Dea Gold 238 S2, Dea Gold 239 S4 |
 |
2 |
||
| Genie |  |
2 |
|||
| Punto S2 |  |
2 |
|||
| Dea MIO TD2, MIO TD4 | 2 |
||||
| DELMA | 300.000 | Apollo 300, ELSAMEC Apollo 300 |  |
6 |
Original remote controls may be not stable in frequency |
| Mizard 300 1, Mizard 300 2, King |  |
6 |
Original remote controls may be not stable in frequency | ||
| 433.920 | Mizard 433 1, Mizard 433 2 |  |
2 |
||
| King 433 2 |  |
2 |
|||
| Style Copy 2CH (this is a code duplicator) | 2 |
||||
| DICKERT | 433.920 | Dickert MAHS433 01, MAHS433 04 Note: we can NOT guarantee that it can be duplicated, because it depends by the receiver. |
 |
Not supported yet! |
|
| Dickert S10-433A1L00, S10-433A4L00, S20-433A1L00, S20-433A4L00, S20-433A1000, S20-433A4000 Note: only RED buttons model can be duplicated! |
 |
2 |
|||
|
Dickert S5-433-A2L00, S5U-433-A2L00 |
 |
2 |
|||
| 868.350 | Dickert HS868-21 Note: only RED buttons model can be duplicated! |
 |
3 |
||
|
Dickert S5-868A2L00, S5U-868A2L00 |
|
3 |
|||
| Dickert S10-868A100, S10-868A400, S20-868A1L00, S20-868A4L00, S20-868A1000, S20-868A4000 Note: only RED buttons model can be duplicated! |
|
3 |
|||
| Dickert S5-868A2L01, S10-868A1L01, S10-868-A4L06, green buttons | 3 | Firmware Rev.03c or later | |||
| DIGICODE | 300.000 310.000 |
DC5010, DC5012, DC5030, DC5032, DC5040, DC5042, DC5060, DC5062, DC5070, DC5072 |  |
6 or 9 |
Original remote controls may be not stable in frequency |
| DITEC | 433.920 | GOL4C |  |
2 |
|
| DOITRAND FDOITRAND |
433.920 | MPSTF2E JAUNE, MPSTF4E, HYPERPHONE MPSTF2E_GRISE |  |
2 |
|
| TS2DE, TS4DE |
 |
2 |
|||
| DOORHAN | 433,920 | 2 | |||
| DOORMATIC | 433.920 | SAW |  |
2 |
|
|
DUCATI |
433.920 | TSAW1, TSAW2, TSAW3, TSAW4, 124 ELBER TSAW1, TSAW2, TSAW3, TSAW4 RONDY TSAW1, RONDY TSAW2, RONDY TSAW3 |
 |
2 |
|
| TPR10-A, TPR20-A RONDY TPR10_A, RONDY TPR20_A |
 |
2 |
|||
| TE2 |  |
2 |
|||
| 6203blue and transparent, with transparent buttons |
|
2 |
|||
|
DÜWI |
433.920 |
Several models, handsender used for radio sockets |
2 |
||
| ELBE | 433.920 | 501, 502, 504 |  |
2 |
|
| 502a, 504a |  |
2 |
|||
| 502, 504 |  |
2 |
|||
| ELCA | 300.000 | Aster 1100, Aster 1101 |  |
6 |
Original remote controls may be not stable in frequency |
| 433.920 |
IRIS, IRIS 9CH. |
 |
2 |
||
| ASTER2 |  |
2 |
|||
| Aster 1000, Aster1001. Colors: black, blue, light grey |
 |
2 |
|||
| GEMINI 9CH | 2 |
||||
| VIRGO |  |
2 |
|||
|
ELDAT |
433.920 | Eldat Basewave RT20-4103M-01, RT20-4104M-01, Eldat RT20-4k, Eldat RT35-4104M-01, RT35-4k, Eldat RT21-4101M-01, RT21-4102M-01, MFZ 400033 , MFZ RT20-4104M-01 | 2 | ||
| Eldat Basewave RT28-4101M-01, RT27-4101M-01, RT26-4101M-02, RT21-4125M-01, RT21-4139M-01, RT21-4139M-02, RT31-4139M-01, RT31-4139M-02, RTC02-4104M-01 | 2 | ||||
| 868.300 | Eldat Basewave RT20-5004M-01, RT20-5003M-01, Eldat RT20-5k, Eldat RT35-5004M-01, RT35-5k, Eldat RT21-5001M-01, RT21-5002M-01, NASSAU RT20-4K | 3 | |||
| Eldat Basewave RT28-5001M-01, RT27-5001M-01, RT26-5001M-02, RT21-5025M-01, RT21-5039M-01, RT21-5039M-02, RT31-5039M-01, RT31-5039M-02, RTC02-5004M-01 | 3 | ||||
|
ELV |
868.350 | FS20 S4, FS20 S8, FS20 S8-2, FS20 S16, FS20S16R, FS20 S20-2, FS20 S20-3 |
 |
3 | |
| ELVOX | 433.920 | Elvox ET02 ZT03 | 2 |
||
| Elvox ET03, ET04 | 2 |
||||
| 868.350 | Elvox ET08 | 3 |
|||
| ERONE | 433.920 | SETDS39433E2, SETDS39433E4 | 2 |
||
| ERREKA | 433.920 | Erreka LUNA, SMAT RESON 1, RESON 2, Erreka RESON 3 |  |
2 | |
| EUROPE AUTOMATISME | 306.000 | ASMY1, ASMY2, ASMY4 | 8 | Original remote controls may be not stable in frequency | |
| 433.920 | ARMY1, ARMY2, ARMY4 | 2 | |||
| S1, S2, S3 | 2 | ||||
| FAAC | 300.000 | Faac TM300S, TM300S05 H Faac TM1 300, TM2 300, TM3 300 |
 |
6 |
Original remote controls may be not stable in frequency |
| 315.000 | Faac T1, T2, T3 Faac TM1 315, TM2 315, TM3 315 |
|
4 |
Original remote controls may be not stable in frequency | |
| 330.000 | Faac TM1, TM2, TM3 Faac TM1 330, TM2 330, TM3 330 |
 |
11 |
Original remote controls may be not stable in frequency | |
| 418.000 | Faac TM1 418 DS, TM2 418 DS, TM3 418 DS | |
14 |
||
| Faac TM 418SL, TM1 418SL, TM2 418 SL, TM3 418SL | |
14 |
|||
| 433.920 | Faac TM1 433 DS, TM2 433 DS, TM3 433 DS TM1 433DS DPH, TM2 433DS DPH, TM3 433DS DPH |
|
2 |
||
| Faac TML2 433 SLR, TML4 433 SLR, TML2-433-SLR, TML4-433-SLR, TML2 433 ESL, TML4 433 ESL |  |
2 |
|||
| Faac TML2 433 SLP, TML4 433 SLP, TML2-433-SLP, TML4-433-SLP | 2 |
||||
| 868.350 | Faac TM1 868 DS, TM2 868 DS, TM3 868 DS Faac TM1 868DS DPH, TM2 868DS DPH, TM3 868DS DPH |
 |
3 |
||
|
FADINI BPT |
315.000 | ASTRO75-1, ASTRO75-2, ASTRO75-4 |  |
4 |
Original remote controls may be not stable in frequency |
| 433.920 | 433 2M, Astro43_2m |  |
2 |
||
| Astro433-2, Astro433-4, Astro43-2, Astro43-4 |  |
2 |
|||
| FERPORT | 433.920 | Tac1, Tac2, Tac4, Tac1k, Tac2k, Tac4k, Tac2kr |  |
2 |
|
|
FUNKMODUL ELSECO |
433.920 | T433A2K1, T433A2K2 | 2 |
||
| T433A2K4, T433A2K4n | 2 |
||||
| GIBIDI | 306.000 | TS2M |  |
8 |
Original remote controls may be not stable in frequency |
| 433.920 | Open TMB 433, OPEN TMQ 433, OPEN OUT 2, OPEN OUT 4 |  |
2 |
||
| GOBBATO | 306.000 | T306 |  |
8 |
Original remote controls may be not stable in frequency |
| GRIFFON | 403.55 | Griffon 404 MHz dip switch remotes and duplicating remotes |  |
13 |
|
| 433.92 | Griffon 433 MHz dip switch remotes and duplicating remotes | |
2 |
||
| GTO | 318.000 | GTO Mighty Mule 1/2 buttons, RB741, RB742 |  |
Not supported yet! |
|
| GTO Mighty Mule 3 buttons, RB743 |  |
Not supported yet! |
|||
| GULLIVER | 306.000 | Gulliver MD/1, Gulliver MD/1, Gulliver MDRQ 306 LABEL |  |
8 |
Original remote controls may be not stable in frequency |
| 433.920 | MDW 2E |  |
2 |
||
| HAUSS | 433.920 | Pocket 3750-1, Pocket3750-2, Pocket 3750-4 | 2 |
||
| HEDDOF | 318.000 | P219-1, P219-2 |  |
Not supported yet! |
|
| P220-1, P220-2, P220-3 |  |
Not supported yet! |
|||
| HORMANN HOERMANN |
433.920 |
HSM2, HSM4, yellow buttons |
 |
2 |
|
| 868.300 | HS1, HS2, HS4, blue buttons |
|
3 |
||
| HSD2 | 3 |
||||
| HSE2, HSE4, blue buttons | 3 | ||||
| HSM2, HSM4, blue buttons |  |
3 |
|||
| HSP4, blue buttons |  |
3 |
|||
| HSS2, HSS4, blue buttons | 3 |
||||
| HSZ1-868, HSZ2-868 |  |
3 |
|||
| HRC | 433.920 | 2 |
|||
| JAY | 433.920 | UBEI x1 SL1 |  |
2 |
|
| UBET 11, UBET 21, UBET 31, UBET 41, UBET 61Â |  |
2 |
|||
| KEY AUTOMATION | 433.920 | 900TXB-42, 900TXB-42N, 900TXP-42, 900TXP-42N |  |
2 |
|
| 900TXB-44, 900TXG-44 | 2 |
||||
| 900SUB-44, 900SUB-44N, 900SUB-44W, 900SUB-44WN | |
2 |
|||
| 900TXK-42, 900TXW-42,900TXK-44, 900TXW-44 |  |
2 |
|||
| KING | 433.920 | Not yet supported! |
|||
| LABEL IUPPITER |
306.000 | MDR, IUPPITER 306 |  |
8 |
Original remote controls may be not stable in frequency |
| 433.920 | RJW/1E, RJW/2E, RJW/4E, RJW/12E |  |
2 |
||
| MDW/1E, MDW/2E | |
2 |
|||
| LEB | 306.000 | TSA4 |  |
8 |
Original remote controls may be not stable in frequency |
| 433.920 | TMW |  |
2 |
||
| TSAW2N, TSAW4N |  |
2 |
|||
| TCP3Â (this is a code duplicator) | 2 |
Not sure it work, because this is a duplicator: check the original remote control | |||
| TRK4 |  |
2 |
|||
| TPW4 |  |
2 |
|||
| 868.300 | TPK4 | |
3 |
||
| LINCE | 433.920 | LR 2035 | 2 | ||
| LINEAR |
300.000 |
MULTI-CODE 308911, 308913, 1089 |  |
6 or 9 |
Original remote controls may be not stable in frequency |
| MULTI-CODE 412001, 414001, 109410, 109710 | 6 or 9 |
Original remote controls may be not stable in frequency | |||
| MULTICODE 306010, 307010, 108210 |  |
6 or 9 |
Original remote controls may be not stable in frequency | ||
| MULTI-CODE 308301, 308302 | 6 or 9 |
Original remote controls may be not stable in frequency | |||
| MULTI-CODE 105015 |  |
6 or 9 |
Original remote controls may be not stable in frequency | ||
| 310.000 | Delta3 Moore-o-Matic: DT, DT2, DT2A, DT22A, DTC, DTD |
 |
9 | Not supported yet! | |
| Delta 3 Moore-o-Matic: DT3, DT4 | 9 | Not supported yet! |
|||
| Delta 3 Moore-o-Matic: Mini-T LB "LadyBug" |  |
9 | Not supported yet! |
||
| 312.000 | Delta3 DTK (canada) | |
Not supported |
||
| MA SYSTEM | 433.920 | MA TX1, MA TX2, MA TX3 |  |
2 |
|
| MARANTEC TECKENTRUP |
418.000 | D212, D222, D232 | 14 |
||
| 433.920 | D101 |  |
2 |
||
| D12 |  |
2 | |||
| D212, D222, D232 | 2 | ||||
| Digital 302, D302 |  |
2 | |||
| Digital 304, D304 |  |
2 | |||
| 868.300 | Digital 302, D302 | |
3 | ||
| Digital 304, D304 | |
3 |
|||
| MCZ | 433.920 | Aster | 2 |
||
| MEIßNER MEISSNER |
433.920 | LW433-1, LW433-2, LW433-4 | 2 |
||
| Pocket 3750 1, 2, 4 | 2 |
||||
|
MKTECHNO |
306.000 | MK-TECHNO TX1 and MKTECHNO TX2, with RED LED |
8 | ||
| MONSEIGNEUR | 433.920 | ARC2, ARC4 |  |
2 |
|
| TDR 400 3845, TDR 400 3846, TDR 400 3847 T1SAW433, T2SAW433, T4SAW433 |
 |
2 |
|||
|
MOTORLINE |
433.920 | MX1, MX2, MX3, MX4, MX6 MX11, MX12, MX13 |
 |
2 |
|
| MOTOSTAR | 433.920 | CLIKSTAR2, CLICKSTAR4 CLICK-4M, CLICKSTAR RE 532, CLICKSTAR RE 534 |
2 |
||
| NICE | 306.000 | EASY S1, S2, S4 |  |
8 |
Original remote controls may be not stable in frequency |
| 433.920 | FLO1, FLO2, FLO4 |  |
2 |
||
| VERY VE | 2 |
||||
| NOLOGO | 306.000 |  |
8 |
Original remote controls may be not stable in frequency |
|
| 433.920 | ECO DIP |  |
2 |
||
| NOVOTECNICA | 306.000 | BIT N1, BIT N2 | 8 |
Original remote controls may be not stable in frequency |
|
| BIT NT1, BIT NT2, BIT NT4 | 2 |
||||
| OG | 433.920 | OG62, OG64 |  |
2 |
|
| O&O OeO O and O |
360.000 | OeO TX2, OeO TX4 (green buttons) |  |
8 | Original remote controls may be not stable in frequency |
| 433.920 | OeO TX2-E, OeO TX4-E (red buttons) |
|
3 | ||
| T-COM DS 4-2, T-COM DS 4-4 | 2 |
||||
| OPENOUT | 306.000 | TS2M |  |
8 |
Original remote controls may be not stable in frequency |
| 433.920 | TMQ 433 2, TMQ 433 4 |  |
2 |
||
| PIAZZETTA | 433.920 | 4 buttons for wood/pellet heater | 2 |
||
| PORTAMATIC | 433.920 | MPH01, MPH02 |  |
2 |
|
|
POWERFIX Profi |
433.920 | RCB-A 3600R | 2 |
||
| PRASTEL | 306.000 | NCSMT1, NCSMT2P, NCSMT4P |  |
8 |
Original remote controls may be not stable in frequency |
| KMFT2P, KMFT4P, KMFT2P93, KMFT4P93 |  |
8 |
Original remote controls may be not stable in frequency | ||
| 433.920 | MPSTF2E, MPSTF4E |  |
2 |
||
| PROEM | 433.920 | ER2C4ACM, ER4C4ACM | 2 |
||
| PROGET | 433.920 | ETY_433N2, ETY 433N4 |  |
2 |
|
| EMI433-N2 |  |
2 |
|||
| PROTECO | 433.920 | TX433 |  |
2 |
|
| EUROMATIC |  |
2 |
|||
| HIT |  |
2 |
|||
| PUJOL | 288.000 | JCM TRINARIO 1, TRINARIO 2, TRINARIO 3 |  |
5 |
Original remote controls may be not stable in frequency |
| 288.000 | TT1, TT2, TRINARIO 1, TRINARIO 2 |  |
5 |
Original remote controls may be not stable in frequency | |
| PULSAR | 318.000 | 9931-318, 9931T-318 |  |
Not supported yet! |
|
| QUASAR | 433.920 | 433 TANGO SLIM BLEU |  |
2 |
|
| QUICK | 433.920 | Model: 302 | |
2 |
|
| ROGER | 433.920 | R80/TX12, R80/TX14, R80/TX12R, R80/TX14R | 2 |
||
| H80/TX22 |  |
||||
| G80/TX32, G80/TX34, G80/TX32R, G80/TX34R | |||||
| SEA |
433.920 |  |
2 |
||
| SMART433_TX2, SMART433_TX3 SMART433_TX2_COPY,SMART433_TX3_COPY Smart2, Smart3 |
 |
2 |
|||
| 868.350 | 231103, SEA868_4 |  |
3 |
||
| 231103, Head2 Dip Switch |  |
3 |
|||
| SMART868-TX2, SMART868-TX3 Smart2, Smart3 |
|
3 |
|||
| SEAV | 306/330 |
TX1, TX2, TX3, TX4, TX1/330 |
 |
8 |
Original remote controls may be not stable in frequency |
| 433.920 | TXS1, TXS2, TXS3, TXS4 | |
2 |
||
| Behappy S1, Behappy S2, Behappy S3 | 2 |
||||
| Be Easy TX, Be Easy Murale2 |  |
2 |
|||
| BeSmart S2, BeSmart S4 | 2 |
||||
| BeFree S1 | 2 |
||||
| 868.300 | BeSmart H2, BeSmart H4 | 3 |
|||
| BeFree H1 | 3 |
||||
| SECURVERA | 433.920 | SV R2C |  |
2 |
|
| SV R2C |  |
2 |
|||
| SV R4C |  |
2 |
|||
| SV R6C |  |
2 |
|||
| SENDER | 433.920 | 2 |
|||
|
SENTRY MARTIN ELECTRONICS |
403.550 | SENTRY binary, SENTRY trinary |
s |
13 |
|
| 433.920 | SENTRY binary | 2 |
|||
| SERAI | 310.000 | OG/32 |  |
9 |
Original remote controls may be not stable in frequency |
| 433.920 | OG/52, OG/54, OG/82, OG/84 |  |
2 |
||
| OG/28, OG/48, OG/62, OG/64 |  |
2 |
|||
| OG/02, OG/04 |  |
2 |
|||
| SICE | 433.920 | TX4 CLACK Bigfoot |  |
Not supported! |
|
| SILVELOX - INTRA | 306.000 | Green case with black buttons | |
8 | Original remote controls may be not stable in frequency |
| 433.920 | Silvelox Intra HSM4 | |
2 | ||
| SIMBA | 433.920 | Simba RC1, Simba RC4 |
2 | ||
| SIMINOR | 433.920 | ER2C4ACM, ER4C4ACM, ER2C4ACS, ER4C4ACS |
2 |
||
| SKYLINK |
300.000 |
MultiLink SD300M, Skylink 100, LD310M, SD310M |
 |
6 or 9 |
Original remote controls may be not stable in frequency |
| 318.000 | Skylink Mltilink PD-318M |  |
Not supported yet! |
||
| 390.000 | Multilink CB-390M, CD-390M (versions compatible with Chamberlain) |
 |
Not supported yet! |
||
| SMD | 433.920 | LW433-1, LW433-2, LW433-4 : AM models only | 2 |
||
| SOMFY | 433.920 | LEB TMW |  |
2 |
|
| STAGNOLI | 433.920 | ZEUS AZTR |  |
2 |
|
| 868.350 | ZEUS AZTR | |
3 |
||
| STANLEY | 310.000 | 24286 |  |
9 |
Original remote controls may be not stable in frequency |
| 1082 | |
9 |
Original remote controls may be not stable in frequency | ||
| 1050 | |
9 |
Original remote controls may be not stable in frequency | ||
| 1094 | 9 |
Original remote controls may be not stable in frequency | |||
| 1097 |  |
9 |
Original remote controls may be not stable in frequency |
||
| STARTEC | 433.920 | TXQ2 |  |
2 |
|
| STINGER | 300.000 310.000 318.000 390.000 |
300MCD21V, 300MCD22V 310MCD21V, 310LID21V, 310LID22V 318ALD31V 390LMD21V, 390LMPB1V |
diff. colors |
This is a compatible remote control: please look for the compatibility of the original retmotes! |
|
| Superior Electronics | 433.920 | Simple2, Simple4 |  |
2 | |
| TAU | 315.000 | 250 TXA2, 250 TXA4 |  |
4 |
Original remote controls may be not stable in frequency |
| 433.920 | 250 SLIM, 250K-SLIM, 250K-SLIMC |  |
2 | ||
| 250TXD2, 250TXD4 |  |
2 |
|||
| 250BUG2, 250BUG4 |  |
2 | |||
| 250T-4, 250T-4C | 2 |
||||
| TEC KEY | 300.000 | MK1010 |  |
6 |
Original remote controls may be not stable in frequency |
| TECNOMATIC | 433.920 | TQ433 | 2 |
||
| TEDSEN BERNER GFA Elektromaten |
433.920 | SKX1MD, SKX2MD, SKX3MD, SKX4MD |  |
2 |
|
| SKX1KD, SKX2KD, SKX4KD, SKX6KD | 2 |
||||
| SKX1DL, SKX2DL, SKX3DL, SKX4DL |  |
2 | |||
| SKX1LC, SKX2LC, SKX3LC, SKX4LC | 2 | ||||
| SKX1SL, SKX2SL, SKX3SL, SKX4SL | 2 | ||||
| SKJ |  |
2 | |||
| SKX1WD, SKX2WD, SKX4WD, SKX11WD, SKX22WD, SKX44WD |  |
2 | |||
| TELCOMA | 306.000 | RCST2, RCST4 | 8 | Original remote controls may be not stable in frequency | |
| 433.920 | TELCOMA EDGE 2, TELCOMA EDGE 4 | 2 | |||
| TELCOMA TANGO 2 SW, TANGO4 SW |  |
2 |
|||
| TANGO BLUE 2, TANGO 4 BLUE, TANGO BLEU 2, TANGO BLEU 4 | 2 |
||||
| TANGO 2 N, TANGO 4 N | 2 |
||||
| TANGO 2 SLIM, TANGO 4 SLIM |  |
2 |
|||
| Telcoma Noire2, Noire4 Note: Rolling-code jumper should be removed from the receiver! |
2 | ||||
| TANGO WIN3 |  |
2 | |||
| TANGO2, TANGO4 | 2 |
||||
| TELEMATIC | 300.000 | TL1, TL2 |  |
6 | Original remote controls may be not stable in frequency |
| TKC | 433.920 | TSAW433 |  |
2 |
|
| TORAG | 433.920 | S429 1, S429 2, S429 4 |  |
2 |
|
| TORMATIC DORMA NOVOFERM |
433.920 | HS, Dorma HS43 1E, HS43 2E, HS43 3E, HS43 4E |  |
2 |
|
| MAHS, Siebau, Novoferm, Dorma |  |
2 |
|||
| MHS, MHS43-1 |  |
2 |
|||
| TREMA | 433.920 | TO93TV1, TO93TV2, TO93TV4 |  |
2 |
|
| TUBAUTO | 433.920 | DIGITAL 101 433 | |
2 |
|
| V2 | 306.000 | TRR1_306 |  |
8 |
Original remote controls may be not stable in frequency |
| 318.000 | TPS1K |  |
10 | Original remote controls may be not stable in frequency | |
| 433.920 | V2 MATCH white, V2 MATCH black |  |
2 | This is a duplicator, so it is not possible to know exactly the transmitting code, but factory programmed code and almost any code supported by this duplicator is also supported by our transmitters |
PHOENIX series: Phoenix2, Phoenix2P, Phoenix4, Phoenix4P, TXC2 Contr.47, TXC4 Contr.47, Handy2 Contr.47, Handy4 Contr.47, TRC4 Contr.47, TSC4 Contr.47 . |
|
2 |
| TCP3 | |
2 | |||
| TCP3, ARC3 | |
2 | |||
| TCP3 |  |
2 | |||
| TPR |  |
2 | |||
| T1SAW/433, T2SAW/433, T4SAW/433 |  |
2 | |||
| TRR1, TRR2, TRR4 |  |
2 | |||
| PMR2, PMR4 |  |
2 | |||
| 868.300 | PHOENIX series: Phoenix2-868, Phoenix2P-868, Phoenix4-868, Phoenix4P-868. Note:the receiver should be programmed with the rolling code feature disabled. |
 |
3 | ||
| VISONIC | 315.000 | WT100, WT100A, WT101, WT101A, WT102, WT104,WT-201, WT-201A, WT-201WP, WT-201AWP |  |
4 |
|
| 418.000 | WT-100, WT-100A, WT-101, WT-101A, WT-102, WT-104,WT-201, WT-201A, WT-201WP, WT-201AWP | 14 |
|||
| 433.920 | WT 100, WT 100A, WT 101, WT 101A, WT 102, WT 104,WT 201, WT 201A, WT 201WP, WT 201AWP | 2 |
|||
| VSEG | 433.920 | CR SLIM | 2 |
||
| WAINE-DALTON | 433.920 | S429-1, S429-2, S429-4, S429-mini | 2 |
||
| S425 | 2 |
||||
|
WECLA |
433.920 | 433, 433_2 |  |
2 |
|
| ZULLAN | 315.000 | 250TXA1H, 250TXA2H, 250TXA4H | |
4 |
Original remote controls may be not stable in frequency |
| OEM | 315.000 |
|
 |
4 |
Original remote controls may be not stable in frequency |


Cannot find your remote control in the Compatible table?
Please send a message by Telegram or Whatsapp to +393283730010 including remote control pictures, brand and model.
Additional information:
Original remote controls may be not stable in frequency: it means that the original remote controls has a transmitter circuitry which frequency may be NOT accurate. Because Sender and SenderBatt has a narrow bandwidth receiver, it can copy only remote control that are stable in frequency, like Creasol Multi, MultiST, Sender, SenderBatt.
Not supported yet!: it means that this kind of remote control cannot be copied now, but will be supported later.
Additional information for Creasol Sender programming/usage
Configure Sender to "car mode"
Push button 9 times, wait for led flashing (default 1 time), then push button 3 times.Set frequency to 433.92MHz for CH1
Push button 1 time (channel 1), led goes ON.Immediately push button 5 times (5=frequency), wait for led flashing (default 3 times=868.3MHz), then push button 2 times (=433.92MHz).
Learn remote control on CH1
Push button 1 time (channel 1), led goes ON.Immediately push button 2 times (2=learn remote controls): led starts flashing slowly.
Push button on the remote control: you should see led emitting 2 quick flashes (code stored), 3 quick flashes (code already stored), or 4 quick flashes (code stored, but is a rolling code so it might not work).
Activating the needed channel using the high-beam level
if you connect Sender power supply to the high-beam lights (to the fuse or relay coil), you have to emit a number of short flashes corresponding to the channel number, plus one long flash (1 second or more)## ########### transmit CH1 ## ## ######### transmit CH2 ## ## ## ########## transmit CH3 ## ## ## ## ########### transmit CH4
ChangeLog2021-11-06Added support for PRASTEL MPSTL2E, GIBIDI, DOITRAND TS2DE.2021-10-04SenderBatt BugFix: fixed hold-to-run mode. In previous versions, hold-to-run mode did not stop transmitting when input has been released, but it keeps transmitting for TIMEOUT seconds.20210225Added 27bit even code2014-01-14Enhanced the number of pulses for MARANTEC remote controls to support new models.2013-06-14Enhanced TX TIME settings: now it's possible to set the number of transmitted frames to 64 and 128 |