")
")
")
")
")
")

Introduction
Creasol DomBus devices are home automation modules that manage inputs, outputs and sensors, available with two protocols:
DomBus proprietary protocol (works with Domoticz by using a python plugin, and also works with Home Assistant, Node-RED, OpenHAB, ioBroker and other systems supporting MQTT-AutoDiscovery protocol by using DomBusGateway software), and Modbus RTU standard protocol that works with Home Assistant, Node-RED and other controllers by using Modbus integration.
Actually we produce the following modules:
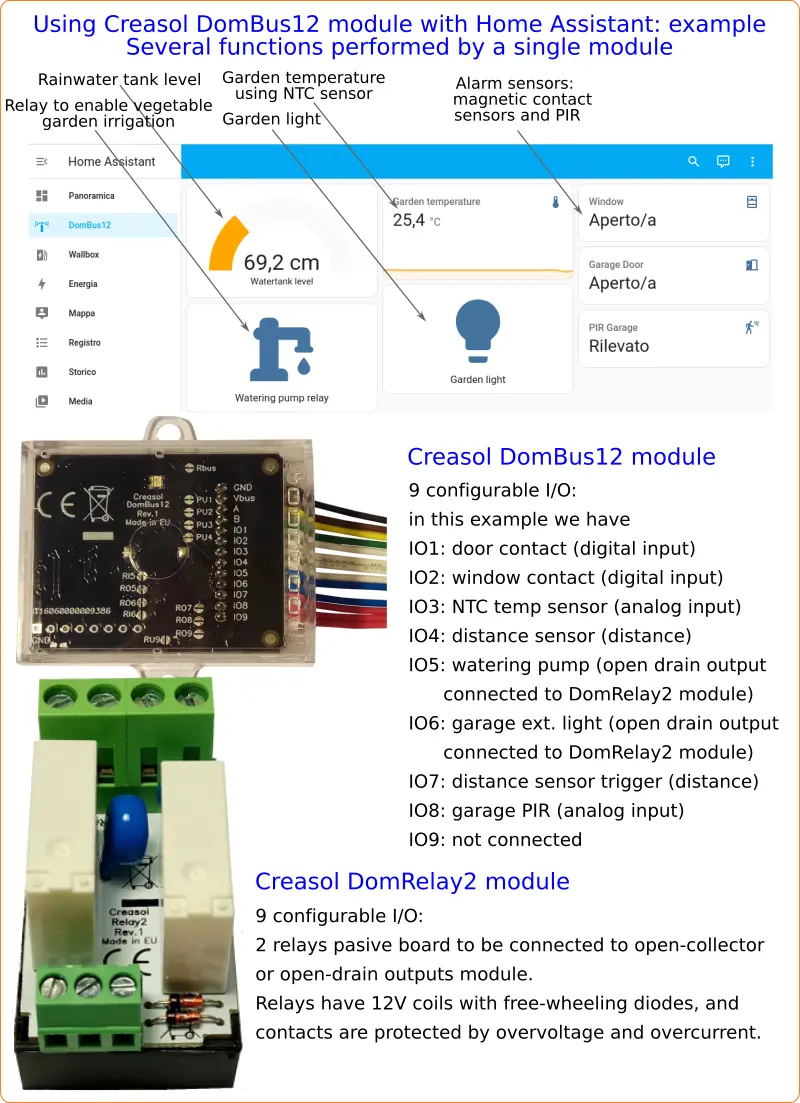
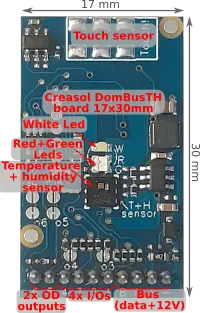
- DomBusTH: Temperature + Relative Humidity sensors, red + green + white LEDs, 4 GPIO, 2 open-drain outputs, 1 analog input
- DomBus12: 7 GPIO, 2 open-drain outputs (configurable also as inputs)
- DomBus21: 3 latching relays 15A (3kW), 1 AC input, 4 inputs
- DomBus23: 2 relay outputs, 1 mosfet output (for 12-24V LED dimming or other DC loads), 2 analog outputs 0-10V, 2 GPIO, 2 low voltage opto-inputs (5-40V), 1 230Vac opto input
- DomBus31: low power module with 6 N.O. relay outputs + 2 N.O./N.C. relay outputs
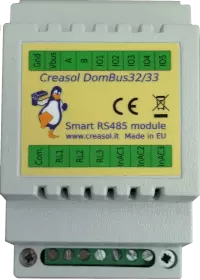
- DomBus32: 3x relays, 3x 230Vac inputs, 5 IOs
- DomBus33: 3x relays, 3x 230Vac inputs, 5 IOs with special firmware to control 3 lights activated by existing step-by-step relays
- DomBus36: 12x relays
- DomBus37: 12x inputs, 3x 230Vac inputs, 3x relay outputs
- DomBus38: 12x inputs, 4 SPDT relays, 2 SPST relays, 1 AC input
- DomBusEVSE: EVSE module usable to build a smart wallbox (electric vehicle charging station)
- DomBusTracker: stand-alone 2-axis solar tracker controller, that can be interfaced by Domoticz, HomeAssistant, Node-RED, OpenHAB, ioBroker, Modbus custom software, ...
Modules are available at https://store.creasol.it and explained in details at https://www.creasol.it/domotics
Using DomBus modules it's possible to make a full domotic system: the following picture describe a real example of a house using Domoticz + DomBus modules to control:
- full alarm system, with PIR and magnetic contact sensors on windows/doors/blinds
- climate control (heating and cooling by heat pump) with optimizations to use the most energy from renewable (photovoltaic system on the roof)
- ventilation control, disabling air renewal, in winter, when the wind blows from certain directions (to prevent combustion fumes from entering the house)
- lights on/off control
- 230V sockets that can be enabled/disabled by smartphone
- garden irrigation and rainwater tank level measure/control
- door bell control: when someone ring the bell, send a picture to the smartphone by Telegram. Obviously, it's also possible to open the gate or pedestrian gate by smartphone
- when presence/movement is detected outside, with the alarm enabled, grab a short 20s video from IPcam near the outdoor sensor and send video to Telegram.
- electric vehicle charging station
- single or dual axis sun tracker for optimized photovoltaic system
DomBusTH is a really powerful and cheap board, to be mount on a blank cover with a 4mm hole in the center, with a touch sensor (to have a virtual pushbutton) that measures emperature and humidity, and have 3 LEDs: red and green LEDs are used to notify alarm, ventilation or electricity power import/export status, and white led is used as night light and emergency light (in case of blackout). Also, it can be connected to piezo buzzer for sound alerts, pushbutton switches, and external relay module DomRelay2 to control 230V sockets or roller shutter motor.
Also, GPIO/input of DomBus modules can be connected to energy meter with pulsed output, to measure the current imported/exported power. As written above, it's possible to show the actual imported/exported power on RED/GREEN Leds of a DomBusTH module.
Other modules are available at https://store.creasol.it/domotics and fully described at https://www.creasol.it/domotics
Using DomBus modules with DomBus firmware
Although DomBus protocol is not a standard, this is the best solution because:
- it's a multi-master protocol: all modules can be master and transmit. Instead, Modbus protocol is a master/slave protocol, and needs that a controller continuously poll all devices to know their states.
- modules notify the controller as soon as a state changes (alarm input, pushbutton, counter/meter, temperature, ...), with less than 100ms latency
- modules can communicate each-other to get small automation working even if the controller is OFF, as KNX does.
How to get DomBus + HomeAssistant working?
- Install mosquitto or another MQTT broker : it's used to get home automation system communicating with all devices
- Install MQTT integration on Home Assistant
- Install DomBusGateway python software: it's used to communicate to DomBus modules by RS485 bus, and to HomeAssistant (or other controller) by MQTT AutoDiscovery. Configure the file dombusgateway_conf_local.py
- Connect the DomBus module to the bus: you can immediately see a new device with the default hardware address of the DomBus module (for example ff38 for DomBus38)
- Change the default address of the module to a unique address (in hex from 1 to efff, or from 1 to 9999) by
* connect DomBusGateway in telnet:telnet localhost 8023
* select the bus, if system have more than one DomBus bus, with commandshowbus 2to select bus number 2. Ignore if only 1 bus is used.
* select the installed module, for exampleshowmodule ff38
* change address to 3801, for example, with the commandsetport 1 hwaddr=3801 -
Now a new device will be available in Home Assistant, for the module with new address 3801
Repeat step 4 and 5 for all modules that should be connected, to form a reliable network of modules (inputs, outputs, sensors, ...) that can work even in case of blackout by supplying the bus using a power supply unit with 12V lead-acid battery.
Using DomBus modules with Modbus firmware
In case that DomBus modules are equipped with Modbus firmware, it's possible to use Home Assistant Modbus integration already available in HA.
Modbus protocol is standard and well supported by Home Assistant as like as other systems (Node-RED, OpenHAB, ...).
Configuration examples are available on GitHub page.
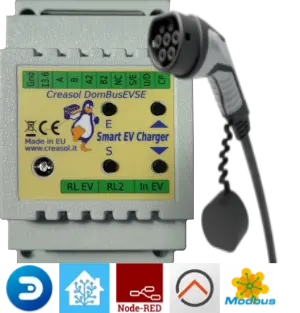
Using DomBusEVSE module with Home Assistant
DomBusEVSE is a smart module that permits to get a home-made EV charging station Mode-3 for vehicles.
The Modbus version of DomBusEVSE can be used with the HomeAssistant hub using the native Modbus integration.
More information are available in the product page, where it's possible to know how to get it working with HA, and in the specific page for HomeAssistant.


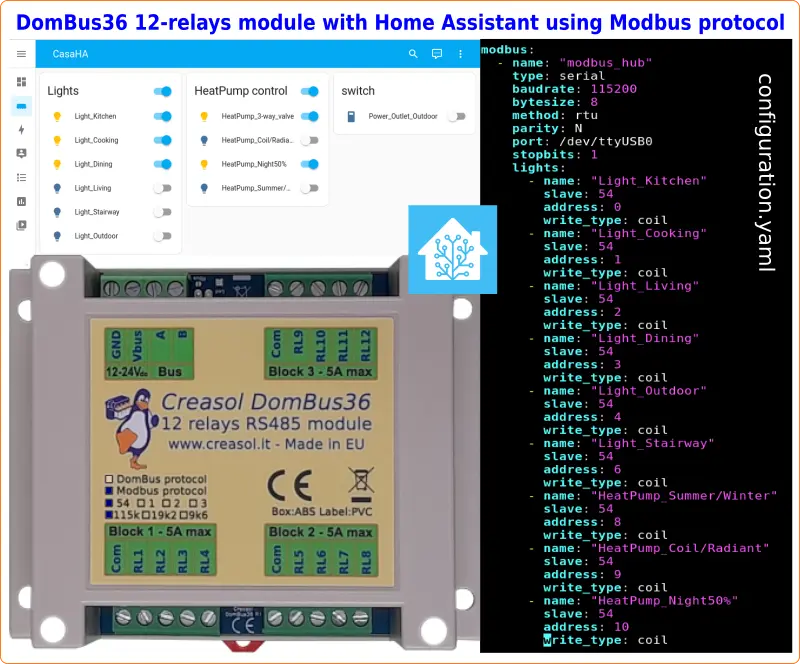
DomBus36, a 12 relays module with Home Assistant
DomBus36 is a simple module with 12 relay outputs, grouped in 3 groups to have an easier wiring: each group share the same common, so you don't need to make jumpers to connect the common wire (Line, Neutral, Ground or +12/24V) to all relays.
Relays are protected from overvoltage and overcurrent, and module has a very low power consumption: less than 15mW with all relays OFF, and less than 750mW when all 12 relays are ON. Please compare with the power consumption of a Shelly, Sonoff, Denkovi or KMTronic module!
DomBus37, a versatile module with 12 low voltage inputs, 3 AC inputs and 3 relay outputs
DomBus37 is a versatile module integrating inputs, AC inputs (to sense 230V presence) and relay outputs.
In the application note below the simplest configuration with Home Assistant.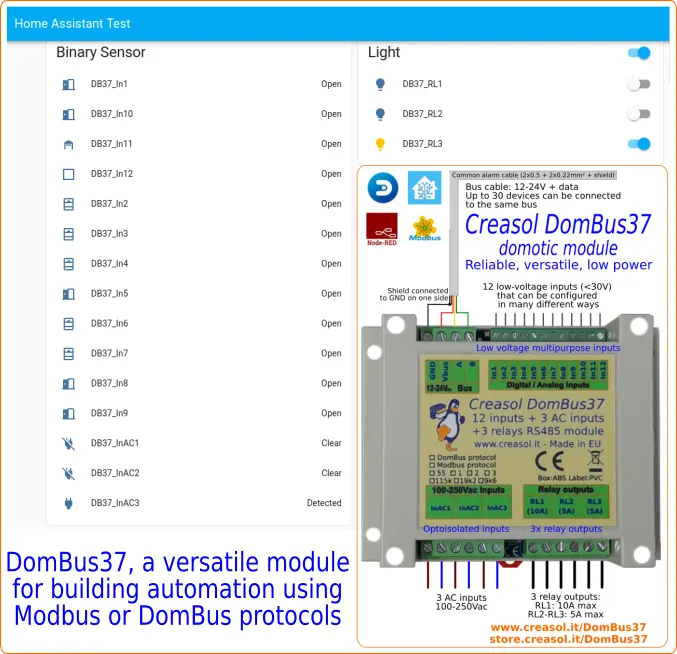
Using DomBus12 to measure water tank level, temperatures, start irrigation and light, check alarm sensors
DomBus12 is a compact and cost effective module with 9 I/Os. Each I/O can be configured as button, switch, double-pushbutton (UP/DOWN pushbutton connected to a single port), counter, meter, NTC temperature sensor, distance sensor, buzzer, led, ...