

ENGLISH
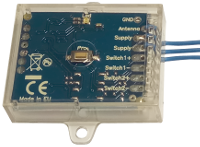
It can be useful to connect a universal receiver like Creasol UniRec1 and Creasol UniRec2 to your operator board FAAC EO24S if you need to open your FAAC automation using another remote control, for example when you have 2 or more different automations and you need to use a single remote control to open all automations.

Connecting the universal receiver is very simple:
Creasol UniRec1 (1 channel universal receiver):
* connect one Supply wire to terminal block 1
* connect one Supply and Switch- wire to terminal block 2
* connect Switch+ wire to terminal block 5
Creasol UniRec2 (2 channels universal receiver):
* connect one +/~ wire to terminal block 1
* connect one -/~ and one Relay1- wire to terminal block 2
* connect the second Relay1 wire to terminal block 5
* connect the antenna coax cable (or a 8/17cm wire) to the receiver
If you'd like to control both total and partial opening, also connect Relay2 wires to terminal blocks 2 and 4
Finally set, if necessary, the frequency, modulation and output type of the receiver, and start learning the remote controls.
==================================
ITALIANO
Può essere utile collegare un ricevitore universale come Creasol UniRec1 o Creasol UniRec2 ad una scheda controllo motori come la FAAC EO24S nel caso si voglia comandare l'automazione FAAC utilizzando un altro radiocomando, ad esempio nel caso si abbiano 2 automazioni diverse che si vuole controllare con un singolo telecomando.
Collegare la ricevente universal è molto semplice:
Creasol UniRec1 (ricevente universale a 1 canale):
* collegare il filo Supply al morsetto 1
* collegare i fili Supply e Switch- al morsetto 2
* collegare il filo Switch+ al morsetto 5
Creasol UniRec2 (ricevente universale a 2 canali):
* collegare +/~ al morsetto 1
* collegare -/~ e uno dei terminali Relay1- al morsetto 2
* collegare il secondo terminale Relay1 al morsetto 5
* collegare il cavo coassiale dell'antenna (oppure un filo lungo 8 o 17cm) al ricevitore
Infine, se necessario, programmare la frequenza, modulazione, modalità di attivazione dell'uscita ricevente, ed apprendere i radiocomandi, seguendo le istruzioni.
If you'd like to control both total and partial opening, also connect Relay2 wires to terminal blocks 2 and 4
New and updated products
News
- Fabriquer une wallbox intelligente faite maison en utilisant Home Assistant pour recharger les véhicules électriques
- Creasol DomBusGateway : Pont DomBus 2 MQTT pour HomeAssistant, NodeRED, OpenHAB, ioBroker, MQTT...
- Prix et coûts horaires de l'électricité pour les pays de l'UE et prévisions de production d'énergie solaire photovoltaïque : script Domoticz
- FAQ veicoli elettrici e fotovoltaico
- Installation d'une image Rasbian + Domoticz optimisée sur Raspberry Pi 3, Pi 4 ou Pi 5
- Intégration du système d'éclairage utilisant des relais pas à pas dans Home Assistant, Domoticz, ...
- Connexion d'un réseau de modules DomBus via TCP (WiFi, Ethernet, ...) ou liaison radio sans fil
- Comment construire un système domotique à l'aide de modules DomBus
- Suggestions: que préparer dans une maison neuve (ou rénovée) pour pouvoir l'automatiser
- CR2032 Lithium-Manganese battey passivation layer
- Creasol DomBus and Home Assistant
- Domoticz, système domotique fiable, gratuit et open source
