

ENGLISH
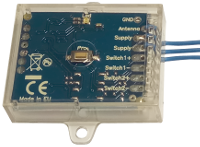
It can be useful to connect a universal receiver like Creasol UniRec1 and Creasol UniRec2 to your operator board FAAC EO24S if you need to open your FAAC automation using another remote control, for example when you have 2 or more different automations and you need to use a single remote control to open all automations.

Connecting the universal receiver is very simple:
Creasol UniRec1 (1 channel universal receiver):
* connect one Supply wire to terminal block 1
* connect one Supply and Switch- wire to terminal block 2
* connect Switch+ wire to terminal block 5
Creasol UniRec2 (2 channels universal receiver):
* connect one +/~ wire to terminal block 1
* connect one -/~ and one Relay1- wire to terminal block 2
* connect the second Relay1 wire to terminal block 5
* connect the antenna coax cable (or a 8/17cm wire) to the receiver
If you'd like to control both total and partial opening, also connect Relay2 wires to terminal blocks 2 and 4
Finally set, if necessary, the frequency, modulation and output type of the receiver, and start learning the remote controls.
==================================
ITALIANO
Può essere utile collegare un ricevitore universale come Creasol UniRec1 o Creasol UniRec2 ad una scheda controllo motori come la FAAC EO24S nel caso si voglia comandare l'automazione FAAC utilizzando un altro radiocomando, ad esempio nel caso si abbiano 2 automazioni diverse che si vuole controllare con un singolo telecomando.
Collegare la ricevente universal è molto semplice:
Creasol UniRec1 (ricevente universale a 1 canale):
* collegare il filo Supply al morsetto 1
* collegare i fili Supply e Switch- al morsetto 2
* collegare il filo Switch+ al morsetto 5
Creasol UniRec2 (ricevente universale a 2 canali):
* collegare +/~ al morsetto 1
* collegare -/~ e uno dei terminali Relay1- al morsetto 2
* collegare il secondo terminale Relay1 al morsetto 5
* collegare il cavo coassiale dell'antenna (oppure un filo lungo 8 o 17cm) al ricevitore
Infine, se necessario, programmare la frequenza, modulazione, modalità di attivazione dell'uscita ricevente, ed apprendere i radiocomandi, seguendo le istruzioni.
If you'd like to control both total and partial opening, also connect Relay2 wires to terminal blocks 2 and 4
New and updated products
News
- Een doe-het-zelf-slimme wallbox maken in samenwerking met Home Assistant om elektrische voertuigen op te laden
- Creasol DomBusGateway: DomBus 2 MQTT-brug voor HomeAssistant, NodeRED, OpenHAB, ioBroker, MQTT...
- Uurtarieven en -kosten voor elektriciteit voor EU-landen, en prognose van de productie van zonne-energie: Domoticz-script
- FAQ veicoli elettrici e fotovoltaico
- Een geoptimaliseerde Rasbian + Domoticz-image installeren op een Raspberry Pi 3, Pi 4 of Pi 5.
- Het integreren van een verlichtingssysteem met stapsgewijze relais in Home Assistant, Domoticz, ...
- Het verbinden van een netwerk van DomBus-modules via TCP (WiFi, Ethernet, ...) of draadloze radioverbinding
- Hoe een domoticasysteem te bouwen met behulp van DomBus-modules
- Suggesties: wat je moet voorbereiden in een nieuwe (of gerenoveerde) woning om dit te kunnen automatiseren
- CR2032 Lithium-Manganese battey passivation layer
- Creasol DomBus and Home Assistant
- Domoticz, betrouwbaar gratis en open source domoticasysteem
